२ जुलाई २०२० को openSUSE Leap 15.2 संस्करण उपलब्ध हुआ।
openSUSE Leap एक निशुल्क और लिनक्स-आधारित ऑपरेटिंग सिस्टम है जो आप अपने पीसी, लैपटॉप या सर्वर पर इस्तेमाल कर सकते है। Leap 15.2 और SUSE Linux Enterprise एक समान कोडबेस उपयोग करते है जिस से openSUSE Leap 15.2 की स्थिरता और ज्यादा मज़बूत होती है।
यह विशेष संस्करण कृत्रिम बुद्धिमत्ता, यानी आर्टिफिशियल इंटेलिजेंस, को अधिक आसानी से सुलभ बनाता है। निम्नलिखित पैकेज ऑफिशल रिपॉजिटरीज से प्राप्त किए जा सकते हैं।
I had a bunch of video files in the .VOB format which I copied from a few DVDs a couple of years back. Uploading them on a cloud storage service (e.g Google Drive, OneDrive etc) for safe keeping is nice but not practical since they cannot be played directly through the cloud service’s video player. The latter would play .MP4 video files.
FFMPEG comes handy here to convert the video files.
ffmpeg -i bla.vob -b:v 3000k -b:a 256k bla.mp4
I used mediainfo to find the maximum video & audio bit rate.
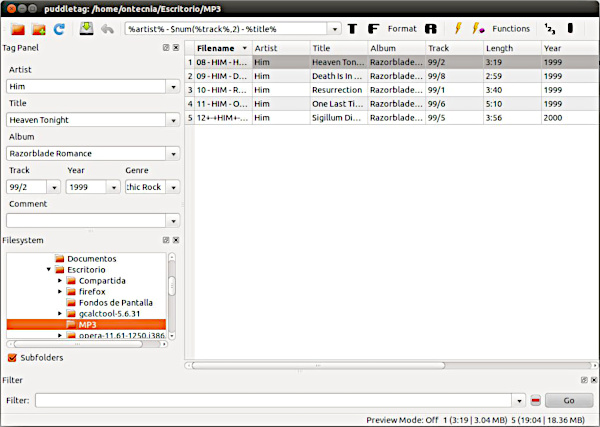
I am a big fan of Puddletag, an audio tag editor for Linux similar to the Mp3tag Windows program. As seen above, Puddletag uses a spreadsheet-like layout which makes it quite unique in the Linux world and matches 100% with how I like tagging to be. Puddletag and I are on the same wavelength and I have been using it for some years now to curate my extensive music collection.
Unfortunately, Puddletag was written in Python 2 and relies on a number of Python 2 libraries. When I upgraded to Fedora Linux 32 a few days ago, I lost a number of those libraries as well as Puddletag (as Python 2 reached its end of life (EOL) on 1st January 2020).
Fortunately, the Linux community came to the rescue and created a corresponding AppImage which works on all new Linux distributions like Fedora 32 or Ubuntu 20.04. Get the AppImage here courtesy of Patsim and have fun!
I’ve tested it in Fedora Linux 32 and it works great!
I generally write in either English, French or Mauritian Kreol.
I also use Libreoffice when I need a word processor or a spreadsheet (or, even, sometimes, a drawing software). Lately, I have discovered Flatpak (“The Future of Apps on Linux”) and Flathub (“An App Store for Linux”) and I am sold. Installing the latest version of Libreoffice from Flathub using Flatpak is a simple:
I have noticed though that this command tends to only install the English dictionaries for spellchecking. I didn’t know how to install more dictionaries to Libreoffice so I asked on the official Flathub forum. And, fortunately, someone from the community pointed me towards the solution. The idea is to get some information about the Libreoffice installation:
$ flatpak info org.libreoffice.LibreOffice

LibreOffice - The LibreOffice productivity suite

ID: org.libreoffice.LibreOffice
Ref: app/org.libreoffice.LibreOffice/x86_64/stable
Arch: x86_64
Branch: stable
Version: 6.4.3.2
License: MPL-2.0
Origin: flathub
Collection: org.flathub.Stable
Installation: system
Installed: 686.0MB
Runtime: org.freedesktop.Platform/x86_64/19.08
Sdk: org.freedesktop.Sdk/x86_64/19.08

Commit: ddcb114395acb30f633a06fd065598ace0fbe4330c49a784a50911b0222f5f95
Parent: fa891c405f685f7859e2bb623b29db5cdb3e9e1d80d8c31f30a5d21edcc9a3eb
Subject: Update to libreoffice-6.4.3.2 (5a34256e) Date: 2020-04-16 18:32:28 +0000
Notice that the runtime is org.freedesktop.Platform/x86_64/19.08 which implies that org.freedesktop.Platform.Locale/x86_64/19.08 contains all the dictionaries. But, as pointed out by stbergmann in the forum,
The *.Locale extensions are special, in that flatpak by default only downloads that part of such an extension that matches the users current system locale, while the –reinstall hack unconditionally downloads all of it. There obviously needs to be usability improvements here, as this appears to be a common issue for users.
And this is the –reinstall hack he is talking about:
In this release, among many changes brought, a notable one is that regarding how we see and think of the Linux /home directory. A new service systemd-homed.service has been added, whose role is to manage home directories.
Traditionally, user information on Linux systems have recorded in the /etc/passwd and /etc/shadow files. The former contains details about the user name, id, group id, shell, home directory, among other details, while the latter contains the user password information.
On the other hand systemd-homed.service stores user information in a ~/.identity file in JSON format. The choice of JSON was mainly due to its popularity and easiness to process with the majority of programming languages.
Thus, every directory managed by systemd-homed.service contains both the user information and the user data.
To create, remove or change home directories one would use the homectl command.
$ sudo homectl create john --real-name="John Doe" -G wheel --disk-size=500M
What if you could carry your home directory in a pendrive and work from any (Linux) machine as if you are “home” ?
$ sudo homectl create john --real-name="John Doe" --image-path=/dev/disk/by-id/usb-SanDisk_Ultra_Fit_476fff954b2b5c44-0:0 --tasks-max=500
The above command creates the user john in a pendrive and assigns a maximum of 500 concurrent task to him.
systemd-homed.service also allows you to have an encrypted home directory, but that, I will write about on another day. 😉
According to its website, “Tracker is a filesystem indexer, metadata storage system and search tool.”
“By using Tracker, you no longer have to remember where you’ve left your files. To locate a file you only need to remember something about it, such as a word in the document or the artist of the song. This is because as well as searching for files in the traditional way, by name and location, Tracker searches files’ contents and metadata.”
That’s great I guess for some people.
For me, Tracker is a massive pain as I have a lot of files, some of them huge and a lot of them being binary files (think images and photos, music files, videos, LibreOffice files, PDF documents, etc.) On my Fedora Linux installation, which is now running in a virtual machine on a brand new MacBook Pro, the Tracker extractor and indexer uses a lot of CPU resources. Too much in fact for something that I never ever use.
You see, I am an “informatician” (i.e. a computer scientist — a very bad designation — think calling a surgeon a scalpel scientist) and, as such, I make it a must to properly save all my files in folders and subfolders. I also name the files very consistently with dates, sensible use of words, etc. for proper sorting and, hence, searching.
So I don’t need Tracker as I pretty much can narrow down to the single file I need in a few seconds.
How to disable Tracker in Gnome
I found the following set of commands online which disable Tracker:
gsettings set org.freedesktop.Tracker.Miner.Files enable-monitors false
gsettings set org.freedesktop.Tracker.Miner.Files ignored-files "['*']"
gsettings set org.freedesktop.Tracker.Miner.Files crawling-interval -2
Looking at the source code of Tracker, the -2 indicates that Tracker should be disabled. The next step is to kill all current Tracker processes:
Quake was born when Christina and I were studying in France in 1996.
Like most people we knew, we fell in love with the game: the graphics were amazing (and we even bought a 3dfx Voodoo 2 to run it), the audio was great and the atmosphere phenomenal. As a matter of fact, Quake is one of the few games I completed. I ran it on Windows 95.
Fast forward 23 years
Today, my laptop runs Fedora Linux 29 and I only use its integrated Intel graphics chipset (despite the laptop having an nVidia chipset as well). This morning, I stumbled upon Quaddicted:
From there, I quickly discovered that, since Quake was released as open source software in 2012, a number of people have embarked on correcting bugs and enhancing the Quake engine. According to Quaddicted (and who am I to disagree!), the best engine for Linux is Quakespasm.
I quickly downloaded it and found an executable called quakespasm-sdl2 which I quickly ran. I got an error message telling me that a folder id1 was not found.
I remembered having zipped my Quake installation years and years ago and, because I am a very methodical guy, took only 5 seconds to find the ZIP. It had the id1 folder in it which I quickly copied to the Quakespasm folder. I got the Quake music. I ran quakespasm-sdl2 again and, lo and behold, Quake started in all its glory. I quickly selected the full screen option and opened a save game from decades ago and it worked! This is what you can see in the top screenshot.
But quake is more than quake…
While reading Quaddicted, a stumbled upon Quake Injector, a tool written in Java which allows you to easily download and run 3rd party maps in Quake. Think maps as levels, distinct from the Quake default levels, but as great and sometimes greater to play.
[Caveat: Quake Injector did not run at first as I had Java 11 on my Linux laptop. I had to switch to Java 8 (which I also had but was inactive)]
As soon as Quake Injector started, I installed the very highly rated DaMaul6 map and this is where I am now. Wish me luck as DaMaul6 is known to be very difficult.
I generally work on my laptop, an old Dell Inspiron 15 still running Fedora Linux 29 quite well. At home, I also tend to work on an Apple iMac (still) running macOS El Capitan (which I intend to upgrade to High Sierra soon — unfortunately, Apple has decided that this iMac cannot run Mojave).
Since the very beginning, I needed to have a proper file synchronisation process for these two computers and cloud solutions such as Google Drive or Dropbox were not options as I had many many Gigabytes to synchronise and this would have been very expensive to be done online.
For 1-2 years, I used Unison, a file synchronisation utility written by one of my Computer Science heroes, Benjamin Pierce, author of the quite renowned book “Types and Programming Languages” which, I have to confess, I have not yet read because, well, I never had the chance to stumble upon it. Anyway, Unison is a tool which does two-way synchronisation between computers and every time there is an inconsistency (a new file, a deleted file, a change, etc.) ask the user to manually choose on the action to make. One important of Unison is that one has to run it manually i.e. the synchronisation only happens when initiated by the user. For example, I like to run Unison every afternoon when I get back home after one day of work.
One year ago, I stopped using Unison. The reason was that I wanted to have real time synchronisation between the two computers i.e. as soon as one changes, the other one is updated (if on of course.) I settled on Syncthing. I tried two different ways of using Syncthing (with a central repository or in peer-to-peer mode) and both worked as expected. But after one year, I have to say that I have two issues with Syncthing. First of all, changes are detected through the inotify mechanism provided by Linux and the macOS kernel. As soon as a file is changed, Syncthing knows about it and can propagate the change to the other computer. All good in principle. But this also means that all errors (a file deleted by mistake, a file overwritten by mistake, etc.) are also immediately propagated. So I used different kinds of versioning techniques to make sure that backups are kept in these situations. But, nevertheless, I slowly realised that real-time propagation might not be a good idea. The second issue is that Syncthing uses a lot of CPU.
Two days ago, I stopped the Syncthing service on all my computers and revived my Unison installation. And, believe it or not, Unison works great for my use case: I can synchronise my computers when I want (after work for instance) and I have the possibility (if there are incoherences) to think deep about which version to keep. For me, and because my files are very valuable to me, this is a much better process.
[At this point, let me point out that I use Unison for synchronisation and I use regular rsync for backup on other devices. It is important to understand the difference between these two processes. Synchronisation is not always needed but backups definitely. Especially when it is compliant with the 3-2-1 strategy.]
What about you? What do you use for synchronising multiple computers when cloud synchronisation is not possible? Do you use Unison? Syncthing? Something else? Why?
The Apache HTTP Server, colloquially called Apache, is a free and open-source cross-platform web server. This article explains briefly how to set up Apache as a reverse proxy to a web site in an internal network.
To set the expectations in this article. I’m not going to explain you how to install Apache web server or how to get it operational on your system. There are thousands of tutorials including my own Accessing your web server via IPv6 on the Internet that already cover that step.
In case more information about the configuration directives used below is needed, I recommend to consult the official documentation of a particular keyword.
The scenario
I have a web site running on a system in an internal network. This could be either a full-fledged Windows/Linux server or an IoT device running on a single board computer (SBC), like i.e. a Raspberry Pi, an Arduino, ESP8266 chipset.
A reverse proxy taking requests from the Internet and forwarding them to servers in an internal network. Source: Wikipedia
Now, I want to enable access from the Internet to that internal server using Apache.
Configuring Apache as reverse proxy
In order to complete our task we need to look into the features of the mod_proxy module for Apache. Here, we get a directive called ProxyPass which does the job as expected. According to Apache’s Reverse Proxy Guide the simplest example proxies all requests ("/") to a single backend:
ProxyPass "/" "http://www.example.com/"
Additionally, to hide any reference to the system on the internal network it is required to specify the directive ProxyPassReverse to modify certain HTTP header values in the response, and use the proxy data instead.
Following is a working example of how to set up a virtual host in Apache that provides reverse proxy capabilities.
<VirtualHost *:80>
        ServerName mediacentre.kirstaetter.name

        ProxyRequests On
        ProxyPreserveHost On
        ProxyVia full

        <Proxy *>
                Order deny,allow
                Allow from all
        </Proxy>

        ProxyPass               /       http://10.0.240.4:8080/
        ProxyPassReverse        /       http://10.0.240.4:8080/
</VirtualHost>
The host system on IP address 10.0.240.4 is part of an OpenVPN infrastructure and therefore accessible from the proxy system.
Multiple proxies possible
No problem with Apache. You can configure and run as many reverse proxies as would like to. One has to pay attention to avoid overlaps either via ServerName directive or by using different port numbers to bind to. Although I have only one reverse proxy running on Apache I configured multiple scenarios using nginx. More details are described in Using nginx as reverse proxy.
Do you have any interesting use cases or active configurations of Apache as reverse proxy? If yes, please use the comment section below give me and other readers more details. Thanks!
Nginx (read: engine-x) has versatile options to set up web sites and more advanced configurations. This article explains briefly how to set up nginx as a reverse proxy to a web site in an internal network.
I have a web site running on a system in an internal network. This could be either a full-fledged Windows/Linux server or an IoT device running on a single board computer (SBC), like i.e. a Raspberry Pi, an Arduino, ESP8266 chipset.
A reverse proxy taking requests from the Internet and forwarding them to servers in an internal network. Source: Wikipedia
Now, I want to enable access from the Internet to that internal server using nginx.
Setting up nginx
In order to set up the solution you need to have a public facing web server on the Internet. Most probably it already runs nginx to serve your web site or blogging software.
I’m running a root server on Debian/GNU Linux and nginx is already installed. You can check your own system quickly like so for any running process:
$ ps fax | grep nginx
Or if you prefer a bit more details like so:
$ sudo service nginx status
● nginx.service - A high performance web server and a reverse proxy server
   Loaded: loaded (/lib/systemd/system/nginx.service; enabled)
   Active: active (running) since Do 2019-01-03 03:28:11 CET; 4 days ago
     Docs: man:nginx(8)
  Process: 29505 ExecStop=/sbin/start-stop-daemon --quiet --stop --retry QUIT/5 --pidfile /run/nginx.pid (code=exited, status=0/SUCCESS)
  Process: 29537 ExecStart=/usr/sbin/nginx -g daemon on; master_process on; (code=exited, status=0/SUCCESS)
  Process: 29535 ExecStartPre=/usr/sbin/nginx -t -q -g daemon on; master_process on; (code=exited, status=0/SUCCESS)
 Main PID: 29539 (nginx)
   CGroup: /system.slice/nginx.service
           ├─29539 nginx: master process /usr/sbin/nginx -g daemon on; master_process on;
           ├─29540 nginx: worker process
           ├─29541 nginx: worker process
           ├─29542 nginx: worker process
           └─29543 nginx: worker process
In case that nginx is not even installed on your system you could look up the package information like so:
$ apt search ^nginx
And install the web server using apt-get like so:
$ sudo apt-get install nginx-full
Which will then install nginx web/proxy server and all its dependencies on your server.
Configuring nginx as reverse proxy
Now, we have an operational installation of nginx on our Internet-facing system. We are going to create a new configuration file that defines the necessary proxy information to access our service on the internal network.
First create a new file below nginx configuration folder using your preferred text editor.
$ cd /etc/nginx/sites-available/
$ sudo nano raspberry
The file name should be relevant to either the kind of services or the system that you are going to shield using nginx as proxy.
Next, write the following server definition into your configuration file. Of course, you would adjust the server name and the IP address according to your environment:
That is the minimal configuration you would have to specify in order to run nginx as a reverse proxy to a system on your internal network. The given IP address needs to be accessible from your public web server, i.e. using a VPN infrastructure based on OpenVPN.
After saving and closing the new nginx configuration it is time to enable and check the syntax for any errors. To enable an available configuration you need to either place it or link it into the folder sites-enabled of nginx.
$ cd ../sites-enabled
$ sudo ln -s /etc/nginx/sites-available/raspberry raspberry
Now, to avoid any unexpected shutdowns or better said launching issues you should always run a configuration test before restarting the nginx service. This can be done quickly using the following command:
$ sudo service nginx configtest
[ ok ] Testing nginx configuration:.
Should your configuration file have any unknown directives and errors the output of configtest looks like this:
$ sudo service nginx configtest
[FAIL] Testing nginx configuration: failed!
You will find more details about the nature of the problem and the line number in the error log file below /var/log, i.e. here:
Only when all problems have been resolved and you have a positive response from the configtest you should restart the nginx service.
$ sudo service nginx restart
Resolve a domain name
The above described sample is very basic, and sometimes it might be necessary to avoid using an IP address for internal service. Luckily, this can configured using the resolver directive in an nginx configuration file like so:
The change in our configuration file now assumes that I have a DNS server running on the local machine which knows how to handle and resolve the specified domain name rasp01.local.
Again, this article covers the basics of reverse proxying using nginx only. There are more interesting scenario like setting your own DNS server on the internal network to provide public access to an internal resource.
Perhaps, you might want to proxy an existing service with your own custom domain, in case that the service provide does not offer this option. Using a public DNS server like Cloudflare’s 1.1.1.1, Google Public DNS (8.8.8.8), or OpenDNS as resolver should give you some ideas.
Provide secure access using SSL
Let’s take the following scenario into consideration. Your internal resource might not be configurable with an SSL certificate but you would like to enable HTTPS protocol communication from the Internet. Setting up nginx with an SSL certificate is well-documented and to combine this with the above described proxy features is a breeze to achieve.
Following you will get a more complete configuration file based on the previous example, now SSL-enabled using a Let’s Encrypt certificate.
The specified SSL options in regards to protocols and ciphers are an arbitrary choice of mine. If you have suggestions on how to improve the SSL setup, please leave a comment below.
Eventually the http2 directive might be an issue. Either check that you are using a recent version of nginx that has HTTP/2 support backed in or remove the value from the listen directive in the configuration file.
Multiple proxies
No problem with nginx. You can configure and run as many reverse proxies as would like to. Right now, I think I have three or four proxies running. Interestingly, one of them is an older set up based on Apache HTTPd which I’m going to write about in a separate article.
Do you have any interesting use cases or active configurations of nginx as reverse proxy? If yes, please use the comment section below give me and other readers more details. Thanks!