Author Archives: Jochen Kirstaetter

Installing SQL Server 2019 and tools on Ubuntu 20.04

Installing SQL Server 2019 and tools on Ubuntu 20.04

Why writing a blog article about the installation of Microsoft SQL Server 2019, related command-line tools, and UI-based management solution despite the official documentation by Microsoft?

There are two main reasons:

  • For own purpose and reference with some additional hints
  • The official documentation seems to be "out-of-sync"

Perhaps reading the official articles Quickstart: Install SQL Server and create a database on Ubuntu and Install the SQL Server command-line tools sqlcmd and bcp on Linux in the Microsoft documentation might be a pre-requisite to the following content.

And the article Installation guidance for SQL Server on Linux provides guidance for installing, updating, and uninstalling SQL Server 2019 on Linux.

However, as mentioned, some information feels out of picture or eventually outdated given existence of newer versions of the referenced applications.

Prepare your system

Before we shall start with the installation of SQL Server 2019, command-line tools and related management software let's be sure that our local system is up-to-date and has the needed packages already installed.

Open a terminal to run the following commands. First one is going to update your local package cache. The second one installs the curl package which we are going to need for future commands.

sudo apt-get update
sudo apt install curl libxss1 libgconf-2-4 libunwind8

Next, import the public repository GPG keys.

curl https://packages.microsoft.com/keys/microsoft.asc | sudo apt-key add -

Don't ignore the trailing dash (-) in the command above. It is essential and therefore necessary. Alternatively this could have been done using wget like so.

wget -qO- https://packages.microsoft.com/keys/microsoft.asc | sudo apt-key add -

Same handling for the trailing dash (-) applies.

Get the packages

Now that the local system has been prepared it is time to get the actual software packages for SQL Server 2019 and command-line tools.

To be able to install SQL Server 2019 use one of the following commands in order to add the package repository.

sudo add-apt-repository "$(wget -qO- https://packages.microsoft.com/config/ubuntu/20.04/mssql-server-2019.list)"
curl https://packages.microsoft.com/config/ubuntu/20.04/mssql-server-2019.list | sudo tee /etc/apt/sources.list.d/mssql-server-2019.list

Then add the package repository for the command-line tools provided by Microsoft accordingly.

curl https://packages.microsoft.com/config/ubuntu/20.04/prod.list | sudo tee /etc/apt/sources.list.d/msprod.list

Alternatively the information of each package repository could be used directly. Here are the corresponding entries for the sources and some more.

# SQL Server 2019
deb [arch=amd64,armhf,arm64] https://packages.microsoft.com/ubuntu/20.04/mssql-server-2019 focal main
# SQL command-line tools as part of the "productivity collection"
deb [arch=amd64,armhf,arm64] https://packages.microsoft.com/ubuntu/20.04/prod focal main

# A few additional Microsoft repos for reference...
# Edge
deb [arch=amd64] http://packages.microsoft.com/repos/edge/ stable main
# Azure CLI
deb [arch=amd64] https://packages.microsoft.com/repos/azure-cli/ focal main
# Visual Studio Code
deb [arch=amd64,arm64,armhf] http://packages.microsoft.com/repos/code stable main

Maybe you prefer to store all Microsoft package sources in one single microsoft.list file rather than having multiple ones.

I highly recommend to read Configure repositories for installing and upgrading SQL Server on Linux for more details on available product options and upgrade channels of SQL Server.

With the newly added repositories for apt it is time again to update the local package cache and to fill it with details about the new packages available.

sudo apt update

After successful update of the package cache you are able to search it for SQL Server related packages, like so.

apt search mssql

Or if you prefer less details, like this.

apt list mssql*
Installing SQL Server 2019 and tools on Ubuntu 20.04

The output of the command above is going to give a list of available packages for SQL Server 2019. Your choice might be different but I'm going to install the actual database engine, with full-text search, the latest command-line tools, and additionally ODBC driver support for Unix/Linux systems.

sudo apt install -y mssql-server mssql-server-fts mssql-tools18 unixodbc-dev

All necessary dependencies will be resolved and installed by apt.

After the installation SQL Server 2019 is not yet running on your system. Run mssql-conf setup command and follow the prompts to choose your edition and set the password of the super-administrator (sa) account.

sudo /opt/mssql/bin/mssql-conf setup accept-eula

After completing the setup, verify that the service is running as expected.

systemctl status mssql-server --no-pager
Installing SQL Server 2019 and tools on Ubuntu 20.04

Finally, add the SQL Server tools to the path by default.

echo 'export PATH="$PATH:/opt/mssql-tools18/bin"' >> ~/.bash_profile
echo 'export PATH="$PATH:/opt/mssql-tools18/bin"' >> ~/.bashrc
source ~/.bashrc

Is it running?

Good question. Let's try and find out. The command-line tools of SQL Server 2019 comes with sqlcmd. The SQL Server command line tool which allows you to connect to local and remote instances of SQL Server including Azure SQL. Run the following to query the product version and edition of your installation.

sqlcmd -S localhost -C -U SA -Q "SELECT @@VERSION"

You will be prompted to enter the password of SA. If you are not familiar with the various command line switches, run sqlcmd -? to get a quick overview.

The resulting output should look similar to this.

Installing SQL Server 2019 and tools on Ubuntu 20.04

Congratulations!

All those steps could be merged into one script to simplify and eventually automate the installation of SQL Server 2019 and its command-line tools. Interestingly the Microsoft documentation has an article on that matter.

Unattended install for SQL Server on Ubuntu - SQL Server
Learn to use a sample Bash script to install SQL Server 2017 on Ubuntu 16.04 without interactive input.
Installing SQL Server 2019 and tools on Ubuntu 20.04

However the presented bash script needs some serious TLC and updates. I suggest that you have look and take it as a starting point only, if needed.

Missing SQL Server Management Studio?

While working with SQL Server on a Windows system the common choice would be SQL Server Management Studio (SSMS) in order to connect to the database server / instance and the database itself. Unfortunately, SQL Server Management Studio is not available on Linux. And probably won't be in the near (and far) future.

There are at least two possibilities to replace SQL Server Management Studio which offer sufficient and similar comfort on Linux.

  • Visual Studio Code with SQL Server (mssql) extension
  • Azure Data Studio
Installing SQL Server 2019 and tools on Ubuntu 20.04
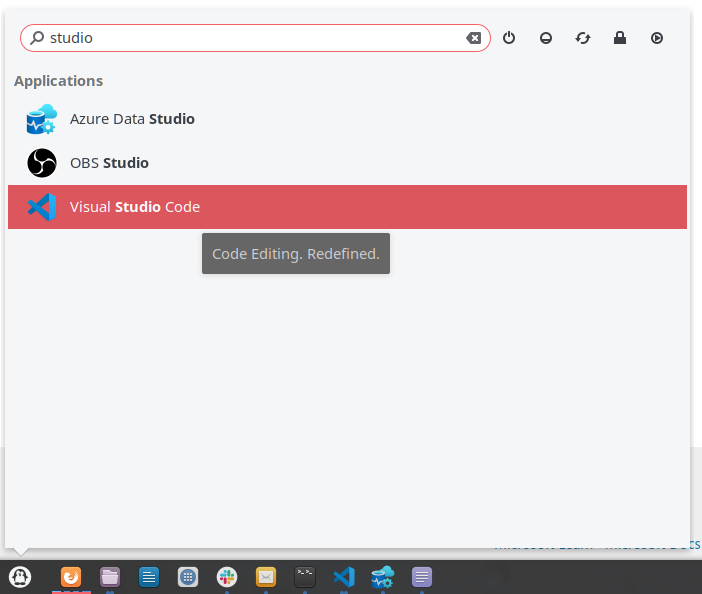
Azure Data Studio and Visual Studio Code shown in the application menu

Both applications have their pros and cons. If you are already developing and writing code in Visual Studio Code you might probably prefer to use the extension and to stay within the same window. In case that you are more into SQL Server handling and Azure you might opt-in for Data Studio.

Download and install Azure Data Studio following this article.

Download and install Azure Data Studio - Azure Data Studio
Download and install Azure Data Studio for Windows, macOS, or Linux. This article provides release dates, version numbers, system requirements, and download links.
Installing SQL Server 2019 and tools on Ubuntu 20.04

Then launch the application via Application menu or run azuredatastudio in a terminal.

Installing SQL Server 2019 and tools on Ubuntu 20.04
Add a connection to a local instance of SQL Server in Azure Data Studio
Installing SQL Server 2019 and tools on Ubuntu 20.04
Azure Data Studio connected to local instance of SQL Server 2019

Install Visual Studio Code using apt.

sudo apt install -y code

Then launch the application via menu or run code in a terminal.

Installing SQL Server 2019 and tools on Ubuntu 20.04
SQL Server (mssql) extension in Visual Studio Code

More details on SQL Server tools can be found here.

SQL tools overview - SQL Server
SQL query and management tools for SQL Server, Azure SQL (Azure SQL database, Azure SQL managed instance, SQL virtual machines), and Azure Synapse Analytics.
Installing SQL Server 2019 and tools on Ubuntu 20.04
Image credit: Leif Christoph Gottwald

Using Apache HTTP as reverse proxy

Using Apache HTTP as reverse proxy

The Apache HTTP Server, colloquially called Apache, is a free and open-source cross-platform web server. This article explains briefly how to set up Apache as a reverse proxy to a web site in an internal network.

To set the expectations in this article. I'm not going to explain you how to install Apache web server or how to get it operational on your system. There are thousands of tutorials including my own Accessing your web server via IPv6 on the Internet that already cover that step.

In case more information about the configuration directives used below is needed, I recommend to consult the official documentation of a particular keyword.

The scenario

I have a web site running on a system in an internal network. This could be either a full-fledged Windows/Linux server or an IoT device running on a single board computer (SBC), like i.e. a Raspberry Pi, an Arduino, ESP8266 chipset.

Using Apache HTTP as reverse proxy
A reverse proxy taking requests from the Internet and forwarding them to servers in an internal network. Source: Wikipedia

Now, I want to enable access from the Internet to that internal server using Apache.

Configuring Apache as reverse proxy

In order to complete our task we need to look into the features of the mod_proxy module for Apache. Here, we get a directive called ProxyPass which does the job as expected. According to Apache's Reverse Proxy Guide the simplest example proxies all requests ("/") to a single backend:

ProxyPass "/"  "http://www.example.com/"

Additionally, to hide any reference to the system on the internal network it is required to specify the directive ProxyPassReverse to modify certain HTTP header values in the response, and use the proxy data instead.

Following is a working example of how to set up a virtual host in Apache that provides reverse proxy capabilities.

<VirtualHost *:80>
        ServerName mediacentre.kirstaetter.name

        ProxyRequests On
        ProxyPreserveHost On
        ProxyVia full

        <Proxy *>
                Order deny,allow
                Allow from all
        </Proxy>

        ProxyPass               /       http://10.0.240.4:8080/
        ProxyPassReverse        /       http://10.0.240.4:8080/
</VirtualHost>

The host system on IP address 10.0.240.4 is part of an OpenVPN infrastructure and therefore accessible from the proxy system.

Multiple proxies possible

No problem with Apache. You can configure and run as many reverse proxies as would like to. One has to pay attention to avoid overlaps either via ServerName directive or by using different port numbers to bind to. Although I have only one reverse proxy running on Apache I configured multiple scenarios using nginx. More details are described in Using nginx as reverse proxy.

Do you have any interesting use cases or active configurations of Apache as reverse proxy? If yes, please use the comment section below give me and other readers more details. Thanks!

Image credit: Nick Fewing

Using nginx as reverse proxy

Using nginx as reverse proxy

Nginx (read: engine-x) has versatile options to set up web sites and more advanced configurations. This article explains briefly how to set up nginx as a reverse proxy to a web site in an internal network.

NGINX is a free, open-source, high-performance HTTP server and reverse proxy, as well as an IMAP/POP3 proxy server. Source: https://www.nginx.com/resources/wiki/

The scenario

I have a web site running on a system in an internal network. This could be either a full-fledged Windows/Linux server or an IoT device running on a single board computer (SBC), like i.e. a Raspberry Pi, an Arduino, ESP8266 chipset.

Using nginx as reverse proxy
A reverse proxy taking requests from the Internet and forwarding them to servers in an internal network. Source: Wikipedia

Now, I want to enable access from the Internet to that internal server using nginx.

Setting up nginx

In order to set up the solution you need to have a public facing web server on the Internet. Most probably it already runs nginx to serve your web site or blogging software.

I'm running a root server on Debian/GNU Linux and nginx is already installed. You can check your own system quickly like so for any running process:

$ ps fax | grep nginx

Or if you prefer a bit more details like so:

$ sudo service nginx status
● nginx.service - A high performance web server and a reverse proxy server
   Loaded: loaded (/lib/systemd/system/nginx.service; enabled)
   Active: active (running) since Do 2019-01-03 03:28:11 CET; 4 days ago
     Docs: man:nginx(8)
  Process: 29505 ExecStop=/sbin/start-stop-daemon --quiet --stop --retry QUIT/5 --pidfile /run/nginx.pid (code=exited, status=0/SUCCESS)
  Process: 29537 ExecStart=/usr/sbin/nginx -g daemon on; master_process on; (code=exited, status=0/SUCCESS)
  Process: 29535 ExecStartPre=/usr/sbin/nginx -t -q -g daemon on; master_process on; (code=exited, status=0/SUCCESS)
 Main PID: 29539 (nginx)
   CGroup: /system.slice/nginx.service
           ├─29539 nginx: master process /usr/sbin/nginx -g daemon on; master_process on;
           ├─29540 nginx: worker process
           ├─29541 nginx: worker process
           ├─29542 nginx: worker process
           └─29543 nginx: worker process

In case that nginx is not even installed on your system you could look up the package information like so:

$ apt search ^nginx

And install the web server using apt-get like so:

$ sudo apt-get install nginx-full

Which will then install nginx web/proxy server and all its dependencies on your server.

Configuring nginx as reverse proxy

Now, we have an operational installation of nginx on our Internet-facing system. We are going to create a new configuration file that defines the necessary proxy information to access our service on the internal network.

First create a new file below nginx configuration folder using your preferred text editor.

$ cd /etc/nginx/sites-available/
$ sudo nano raspberry

The file name should be relevant to either the kind of services or the system that you are going to shield using nginx as proxy.

Next, write the following server definition into your configuration file. Of course, you would adjust the server name and the IP address according to your environment:

server {
    listen 80;
    listen [::]:80;
    
    server_name raspberry.kirstaetter.name;
    server_tokens off;

    location / {
        proxy_set_header X-Real-IP $remote_addr;
        proxy_pass 10.0.240.3;
    }
}

That is the minimal configuration you would have to specify in order to run nginx as a reverse proxy to a system on your internal network. The given IP address needs to be accessible from your public web server, i.e. using a VPN infrastructure based on OpenVPN.

After saving and closing the new nginx configuration it is time to enable and check the syntax for any errors. To enable an available configuration you need to either place it or link it into the folder sites-enabled of nginx.

$ cd ../sites-enabled
$ sudo ln -s /etc/nginx/sites-available/raspberry raspberry

Now, to avoid any unexpected shutdowns or better said launching issues you should always run a configuration test before restarting the nginx service. This can be done quickly using the following command:

$ sudo service nginx configtest
[ ok ] Testing nginx configuration:.

Should your configuration file have any unknown directives and errors the output of configtest looks like this:

$ sudo service nginx configtest
[FAIL] Testing nginx configuration: failed!

You will find more details about the nature of the problem and the line number in the error log file below /var/log, i.e. here:

$ sudo cat /var/log/nginx/error.log
2019/01/07 13:50:07 [emerg] 21662#21662: unknown directive "server_?name" in /etc/nginx/sites-enabled/raspberry:5

Only when all problems have been resolved and you have a positive response from the configtest you should restart the nginx service.

$ sudo service nginx restart

Resolve a domain name

The above described sample is very basic, and sometimes it might be necessary to avoid using an IP address for internal service. Luckily, this can configured using the resolver directive in an nginx configuration file like so:

server {
    listen 80;
    listen [::]:80;
    
    server_name raspberry.kirstaetter.name;
    server_tokens off;

    resolver 127.0.0.1;
    
    location / {
        proxy_set_header X-Real-IP $remote_addr;
        proxy_pass rasp01.local;
    }
}

The change in our configuration file now assumes that I have a DNS server running on the local machine which knows how to handle and resolve the specified domain name rasp01.local.

Again, this article covers the basics of reverse proxying using nginx only. There are more interesting scenario like setting your own DNS server on the internal network to provide public access to an internal resource.

Perhaps, you might want to proxy an existing service with your own custom domain, in case that the service provide does not offer this option. Using a public DNS server like Cloudflare's 1.1.1.1, Google Public DNS (8.8.8.8), or OpenDNS as resolver should give you some ideas.

Provide secure access using SSL

Let's take the following scenario into consideration. Your internal resource might not be configurable with an SSL certificate but you would like to enable HTTPS protocol communication from the Internet. Setting up nginx with an SSL certificate is well-documented and to combine this with the above described proxy features is a breeze to achieve.

Following you will get a more complete configuration file based on the previous example, now SSL-enabled using a Let's Encrypt certificate.

server {
    listen 80;
    listen [::]:80;
    listen 443 ssl http2;
    listen [::]:443 ssl http2;

    server_name raspberry.kirstaetter.name;
    server_tokens off;
    server_name_in_redirect off;

    client_max_body_size 50m;

    ssl on;
    ssl_certificate         /etc/letsencrypt/live/raspberry.kirstaetter.name/fullchain.pem;
    ssl_certificate_key     /etc/letsencrypt/live/raspberry.kirstaetter.name/privkey.pem;

    # modern configuration. tweak to your needs.
    ssl_protocols TLSv1 TLSv1.1 TLSv1.2;
    ssl_ciphers 'ECDHE-ECDSA-AES256-GCM-SHA384:ECDHE-RSA-AES256-GCM-SHA384:ECDHE-ECDSA-CHACHA20-POLY1305:ECDHE-RSA-CHACHA20-POLY1305:ECDHE-ECDSA-AES128-GCM-SHA256:ECDHE-RSA-AES128-GCM-SHA256:ECDHE-ECDSA-AES256-SHA384:ECDHE-RSA-AES256-SHA384:ECDHE-ECDSA-AES128-SHA256:ECDHE-RSA-AES128-SHA256';
    ssl_prefer_server_ciphers on;

    # HTTP headers
    add_header X-Content-Type-Options nosniff;
    add_header X-Frame-Options SAMEORIGIN;
    add_header X-XSS-Protection "1; mode=block";
    add_header Referrer-Policy no-referrer-when-downgrade;

    root /var/www/raspberry;
    access_log /var/log/nginx/raspberry.kirstaetter.name.access_log gzip;
    error_log /var/log/nginx/raspberry.kirstaetter.name.error_log info;

    resolver 127.0.0.1;
    
    location / {
        proxy_set_header X-Real-IP $remote_addr;
        proxy_pass rasp01.local;
    }

    location ~ /.well-known {
        allow all;
    }
}

The specified SSL options in regards to protocols and ciphers are an arbitrary choice of mine. If you have suggestions on how to improve the SSL setup, please leave a comment below.

Eventually the http2 directive might be an issue. Either check that you are using a recent version of nginx that has HTTP/2 support backed in or remove the value from the listen directive in the configuration file.

Multiple proxies

No problem with nginx. You can configure and run as many reverse proxies as would like to. Right now, I think I have three or four proxies running. Interestingly, one of them is an older set up based on Apache HTTPd which I'm going to write about in a separate article.

Do you have any interesting use cases or active configurations of nginx as reverse proxy? If yes, please use the comment section below give me and other readers more details. Thanks!

Image credit: Otto Norin

OpenVPN: All TAP-Windows adapters on this system are currently in use

OpenVPN: All TAP-Windows adapters on this system are currently in use

Working with several clients or partners might be an interesting challenge sometimes. While adding a new connection to an existing OpenVPN infrastructure I came across the following error message in the client log file: All TAP-Windows adapters on this system are currently in use.

Depending on how you actually installed your VPN client software you might be facing this issue while adding an additional client configuration for another connection. Especially when you are using a client software by a third-party provider, ie. WatchGuard Mobile VPN or Sophos. Perhaps you might be struggling to resolve it.

Get the TAP-Windows driver

Check whether you have the full installation of OpenVPN software. If yes, you might like to skip this the following steps and directly move on to add another TAP adapter to your Windows system.

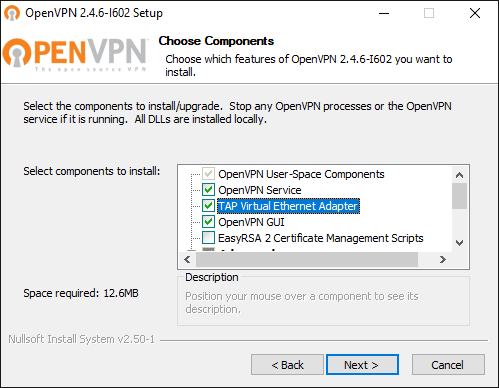
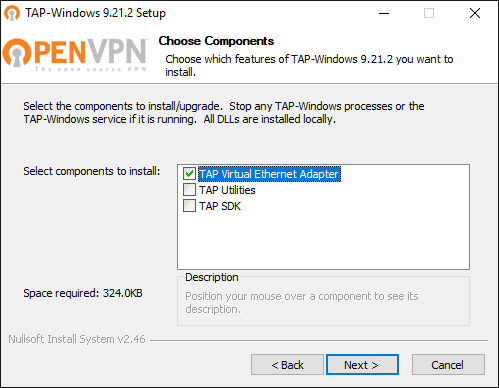
Otherwise, please navigate to the Community Downloads of OpenVPN and either get the latest OpenVPN package, or if you think that this might be an issue, scroll down a little bit on same page and get Tap-windows package for your system. After the download is complete, run the installation routine and make sure to select TAP Virtual Ethernet Adapter like so:

OpenVPN: All TAP-Windows adapters on this system are currently in use

OpenVPN: All TAP-Windows adapters on this system are currently in use

You might have to reboot Windows to complete the network driver installation.

Add a new TAP virtual ethernet adapter

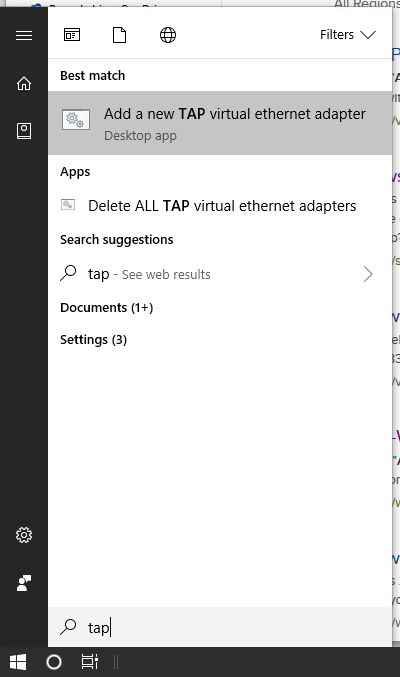
Now, you should be able to add an additional TAP interface to your system, and make it available for your new OpenVPN connection. Hit the Start button or press the Win key, then type tap and wait for Windows to give you its matches found on the system. Here is how it looks like on my Windows 10:

OpenVPN: All TAP-Windows adapters on this system are currently in use

Click on the entry Add a new TAP virtual ethernet adapter and confirm the User Account Control (UAC) dialog with Yes. You then see an administrative command prompt that adds another network interface to your Windows.

C:\WINDOWS\system32>rem Add a new TAP virtual ethernet adapter

C:\WINDOWS\system32>"C:\Program Files\TAP-Windows\bin\tapinstall.exe" install "C:\Program Files\TAP-Windows\driver\OemVista.inf" tap0901
Device node created. Install is complete when drivers are installed...
Updating drivers for tap0901 from C:\Program Files\TAP-Windows\driver\OemVista.inf.
Drivers installed successfully.

C:\WINDOWS\system32>pause
Press any key to continue . . .

And your OpenVPN client is ready to roll.

The shortcut below the Windows Start menu is linked to a batch file which you can also access and launch directly from %ProgramFiles%\TAP-Windows\bin

OpenVPN: All TAP-Windows adapters on this system are currently in use

Note: Ensure to run the batch file with administrative permissions. Otherwise, the driver installation will fail.

Review your existing Network Connections

Perhaps you would like to inspect the existing TAP-Windows Adapters? You find them in the Control Panel under Network Connections.

OpenVPN: All TAP-Windows adapters on this system are currently in use

The adapters are classified as TAP-Windows Adapter V9. Here you can enable, disable or even delete an existing network interface.

Some readers might prefer interaction with a command line interface (CLI). Well, even on Windows there is nothing to worry about this. The Network Shell (Netsh) of Windows has you covered, although it is recommended to use PowerShell to manage networking technologies:

PS C:\> Get-NetAdapter

Name                      InterfaceDescription                    ifIndex Status       
----                      --------------------                    ------- ------       
vEthernet (Default Swi... Hyper-V Virtual Ethernet Adapter             30 Up           
Wi-Fi                     Killer Wireless-n/a/ac 1535 Wireless...      28 Up           
Ethernet                  Killer E2500 Gigabit Ethernet Contro...      19 Disconnected 
Ethernet 4                TAP-Windows Adapter V9 #2                    15 Disconnected 
VMware Network Adapte...8 VMware Virtual Ethernet Adapter for ...      14 Up           
VMware Network Adapte...1 VMware Virtual Ethernet Adapter for ...      13 Up           
Ethernet 2                ThinkPad USB-C Dock Ethernet                  8 Disconnected 
Ethernet 5                TAP-Windows Adapter V9 #3                    52 Up           
VirtualBox Host-Only ...2 VirtualBox Host-Only Ethernet Adap...#2       6 Up           
Ethernet 3                TAP-Windows Adapter V9                        5 Up           

The information provided is identical to the visual representation in Windows Explorer.

OpenVPN re-visited

OpenVPN re-visited

It's been a very long time since I set up the VPN infrastructure at the office using OpenVPN. Today, I came across an interesting log entry that I would like to document quickly.

OpenVPN re-visited

At the time of writing I have OpenVPN 2.4.6 running on my Windows 10 machine. The existing infrastructure though is on a different version, and this morning I observed the following entries in the log file:

Tue Aug 28 08:50:09 2018 WARNING: INSECURE cipher with block size less than 128 bit (64 bit).  This allows attacks like SWEET32.  Mitigate by using a --cipher with a larger block size (e.g. AES-256-CBC).
Tue Aug 28 08:50:09 2018 WARNING: cipher with small block size in use, reducing reneg-bytes to 64MB to mitigate SWEET32 attacks.

Curious about those entries I found Sweet32: Birthday attacks on 64-bit block ciphers in TLS and OpenVPN as an informative reference on the documented vulnerabilities CVE-2016-2183 and CVE-2016-6329. There I found the connection back to OpenVPN. Which is also described on the official wiki: OpenVPN and SWEET32

The default encryption for the transport protocol of OpenVPN is Blowfish – a 64-bit cipher – with the CBC mode.

Meaning, the default encryption of OpenVPN prior to version 2.4 is BF-CBC which doesn't provide enough security in recent times. Newer versions of OpenVPN though are using AES-256-CBC as default cipher.

Upgrade your cipher suite and block size

For your own sake and safety of your network(s) you should check and change your OpenVPN infrastructure right away, and if needed upgrade your defined cipher to a more secure encryption and larger block size.

OpenVPN users can change the cipher from the default Blowfish to AES

First, check which ciphers are available on your server and clients using the --show-ciphers option like so:

$ sudo openvpn --show-ciphers
The following ciphers and cipher modes are available
for use with OpenVPN.  Each cipher shown below may be
used as a parameter to the --cipher option.  The default
key size is shown as well as whether or not it can be
changed with the --keysize directive.  Using a CBC mode
is recommended.

DES-CBC 64 bit default key (fixed)
RC2-CBC 128 bit default key (variable)
DES-EDE-CBC 128 bit default key (fixed)
DES-EDE3-CBC 192 bit default key (fixed)
DESX-CBC 192 bit default key (fixed)
BF-CBC 128 bit default key (variable)
RC2-40-CBC 40 bit default key (variable)
CAST5-CBC 128 bit default key (variable)
RC2-64-CBC 64 bit default key (variable)
AES-128-CBC 128 bit default key (fixed)
AES-192-CBC 192 bit default key (fixed)
AES-256-CBC 256 bit default key (fixed)
CAMELLIA-128-CBC 128 bit default key (fixed)
CAMELLIA-192-CBC 192 bit default key (fixed)
CAMELLIA-256-CBC 256 bit default key (fixed)
SEED-CBC 128 bit default key (fixed)

Depending on your underlying Linux system the list might be more or less exhaustive. Have a look and then choose a key length of at least 128 bit.

OpenVPN currently recommends using AES-256-CBC or AES-128-CBC.

Following the article on OpenVPN and SWEET32 I chose to use AES-256-CBC cipher suite for my existing infrastructure. This seems to give me the largest compatibility between OpenVPN installations on various clients, including Raspberry Pi.

Change your OpenVPN configuration

Independent of the OpenVPN version installed, you can specify the cipher directive in your configuration files - server and client likewise. Usually that directive is either not present or commented, meaning it uses the compiled default value. Change it to your needs like so:

# Select a cryptographic cipher.
# This config item must be copied to
# the client config file as well.
;cipher BF-CBC        # Blowfish (default)
;cipher AES-128-CBC   # AES
cipher AES-256-CBC

This needs to be applied on the OpenVPN server first as well as on all OpenVPN clients. Save your configuration file and reload the new settings.

$ sudo service openvpn reload

Perhaps, you might like to publish your updated client configuration file(s) a bit earlier. With the newly set cipher any connecting client will be rejected now, if the cipher suites do not match. Monitor your syslog output on the OpenVPN server for that kind of entries:

Aug 28 07:33:26 smtp ovpn-server[18351]: 1.2.3.4:47081 WARNING: 'cipher' is used inconsistently, local='cipher AES-256-CBC', remote='cipher BF-CBC'
Aug 28 07:33:26 smtp ovpn-server[18351]: 1.2.3.4:47081 WARNING: 'keysize' is used inconsistently, local='keysize 256', remote='keysize 128'
...
Aug 28 07:34:08 smtp ovpn-server[18351]: client/1.2.3.4:47081 Authenticate/Decrypt packet error: cipher final failed

This way you are able to find out which clients are still running on the previous configuration and therefore would need a little bit of assistance.

Other hardware firewall based on OpenVPN

Thanks to some of the clients of my company IOS Indian Ocean Software Ltd. it happens that I have to connect to their networks via VPN from time to time. Given the changed cipher of my own OpenVPN infrastructure I wanted to see what others are using.

According to my own article Connecting Linux to WatchGuard Firebox SSL (OpenVPN client) one of the client configuration reads like this:

cipher AES-256-CBC

Whereas for another client who is using a firewall from Sophos the chosen cipher suite looks like this:

cipher AES-128-CBC

Well, looks like I'm in good company with my new option.

Security is a process, not a state

Again, lesson learned. Although running services on Linux is mainly about setting them up properly at the beginning, it surely doesn't mean to forget about them in the long run. Regular reviews and audits help to mitigate newer issues and threats to your network infrastructure.

If you are an active OpenVPN user please use the comment section to share other security related configuration settings and hardening tips on OpenVPN. That would be much appreciated by myself and other readers. Thanks!

Next stop: MCSA: Linux on Azure

Next stop: MCSA: Linux on Azure

Recently I decided to coordinate my work and learning activities a little bit. Turns out that while working with .NET Core, in particular developing an API project, I do quite some coding under Linux using Visual Studio Code.

During office hours I'm fully emerged into Visual Studio 2017 running on my Windows 10 machine but often I'm reviewing and tweaking some of my code during the evening hours on my secondary Xubuntu system.

Linux and me

The story about me using Linux goes back two decades. Actually, if I remember correctly it happened some time in summer of 1996 when I officially purchased a copy of S.u.S.E. Linux 4.2. At that time I was still studying Applied Chemistry at the University of Kaiserslautern and the Unix AG on the campus offered copies of Slackware among others for free; you only had to bring the empty CDs to get the software burned on.

Note: The Unix AG was founded and still is run by a group of students and assistants in the field of computer science. And at that time there was a nice fellow named Klaus Knopper, famously known for his Linux distribution Knoppix.

Apart from attending lectures and running experiments in the chemistry laboratory I spent a good amount of time in the university's computer labs, too. Over there you had access to graphical XTerminals running on AIX Unix compared to the regular ASCII terminals anywhere else on campus.

The two reasons I bought a copy of S.u.S.E were because I wanted to set up an internet gateway at home which I was not able to do so with Windows NT 4.0, and because the distribution was bundled with several books on installation, network configuration and Linux in general in German language. So, I started the initial installation on a Friday afternoon, worked through the whole night reading and configuring the system several times, and slept only a few hours over the whole weekend. Finally, on Monday morning after several attempts and lots of swearing/ranting over my own incapabilities I managed to run a working internet gateway. Dialup happened over ISDN on my freshly installed Linux computer while my parent's system running Windows 95 was attached to the 10base2 thin Ethernet network.

The rest is history...

Azure is running (on) Linux

Eventually you might be aware of the situation that Microsoft is actually using Linux technology to run its cloud solution named Azure.

Yes, they do... According to an article Whoa. Microsoft is using Linux to run its cloud published on Wired back in September 2015 it is referring to an official blog article by Microsoft. Get more details about the Azure Cloud Switch in Microsoft showcases the Azure Cloud Switch (ACS) by Kamala Subramaniam Principal Architect, Azure Networking.

It [note: The Azure Cloud Switch (ACS)] is a cross-platform modular operating system for data center networking built on Linux.

Nonetheless, I would assume that the main interest would be to run and operate Linux machines in Azure. According to Microsoft says 40 percent of all VMs in Azure now are running Linux we are in good company with like-minded system operators.

What better than combining two technology stacks? Although, I work on Windows systems during my day job, Linux plays a vital role. Our internet gateways are based on a designated Linux system which handles all internal traffic and provides access to the internet by providing essential services like DHCP, DNS, proxy and so forth. Services the standard router provided by a local ISP might not be capable of or with serious security concerns.

Using Azure to provision a Linux-based virtual machine takes less than 5 minutes and there are various options available.

Next stop: MCSA: Linux on Azure

I'm a big fan of Xubuntu but to prepare myself for MCSA: Linux on Azure I'm going to need a CentOS based system. So, instead of taking resources on my local machine using a virtualisation software like VirtualBox or VMware I'm going to entertain a Linux VM on Azure. It's more convenient after all.

MCSA: Linux on Azure

Combining both technology stacks into one sounds almost like a dream coming true for me. Using Linux has always been a passion and fun factor for me and being able to add it more and more to my professional services brought me to the decision to look into the benefits and requirements of Microsoft's MCSA: Linux on Azure certification.

Effectively, the exam requirements stipulate that one has to pass two independent certifications to achieve MCSA: Linux on Azure:

You might have noticed that it is not purely a Microsoft certification but integrates the work of the Linux Foundation. Interestingly Microsoft officially announced during the Connect(); 2016 that they joined the Linux Foundation as a Platinum Member. Which literally made the Linux on Azure certification possible.

Our membership to the Linux Foundation builds on our work with the foundation, including the creation of a Linux on Azure certification.

Exciting times, don't you think?

Exam formats

Both, Microsoft and the Linux Foundation, offer details about the skill sets being measured during the exams. The Microsoft exam 70-533 is based on the usual multiple choice format. Compared to that the LFCS is performance-based.

Candidates will need to perform tasks or solve problems using the command line interface in their chosen Linux distribution.

Meaning, you connect to an actual Linux system - running either CentOS 7 or Ubuntu 16 (as of writing) - and you have to get your "hands dirty" in order to qualify.

Learning resources

Check out the section Optional training and resources on the official LFCS website. The Linux Foundation provide free material like their Certification Candidate Handbook, their Certification Preparation Guide, and their LFSx01 courses online.

In similar fashion Microsoft lists multiple resources in the Preparation options of the exam 70-533. The online training is accessible for free through the edX platform and are part of the Microsoft Professional Program in Cloud Admin, too.
Using the same preparation material gives you the ability to achieve a second accreditation. Perhaps you are interested to read more about the Cloud Administration professional program.

Having an active, annual subscription with Pluralsight I browsed through their learning paths and discovered Pluralsight Path to MSCA: Linux on Azure. It's a combination of several courses provided by experts John Savill and Andrew Mallett.

More resources will be added regularly to my 100-days-of-exam repository on GitHub. You are hereby invited to fork it, to add more resources including other exam preparations, and to send me your pull requests (PRs).

Commitment to #100DaysOfExam

To keep myself accountable I am committed to the #100DaysOfExam challenge.

I will learn and prepare for an exam for at least an hour every day for the next 100 days.

Following the Rules section of #100DaysOfExam I will tweet about my progress using hashtag #100DaysOfExam and I will update my Log with the day's progress and provide a link every day, too.

Let's do it!

ICT skills at primary school

ICT skills at primary school

Our children have computer lectures at their primary school since this year. In general, it's a great idea that students are exposed to computer literacy at an early stage. But sometimes it comes with small hiccups. Like in our case...

Curriculum, literature and exercise book

Although our children have access to computers at home since a while already it is the curriculum of their primary school in regards to IT literacy that lead to this blog article.

The title "Let's Learn ICT Skills" by the Mauritius Institute of Education (MIE) introduces Computer Fundamentals and Operations to young learners at primary school level. The textbook is divided into six units and covers first steps into the world of ICT.

Starting with an orientation in Windows the title discusses the essential use of typical desktop applications to handle word processing, to introduce simple graphics and presentation skills, to cover basic functionality in spreadsheets and to venture into the unknown areas of the interweb.

Each chapter has different learning objectives and introduces elementary skills in various applications. To keep matters easy the textbook is focused on Windows operating system and the Microsoft Office suite. Which in general and most commonly okay for the majority of primary school students.
Not sure whether it classifies as a tutorial. You are most welcome to comment and assist. #BlogMore about modern parenting obstacles...

https://jochen.kirstaetter.name/azure-for-school/
Well, most students... ;-)

Our start situation - Linux

As a parent it is not easy to trust a full-fledged computer into the hands of your youngster(s) without fearing the whole system might be infested by viruses, malware and ransomware in shortest time. Especially given recent reports on various problems.

Following my decision to provide our kids with family-friendly and security-enhanced tablets running on Amazon's Fire OS compared to regular Android, it was only right to provide them a similar experience on the desktop. At least in my point of view.

Personally, it was important for me to have peace of mind knowing our children are using Linux based system. Don't get me wrong Microsoft has done a tremendous job to improve security over the last decade. It's just that I didn't want to purchase a new laptop for them and Linux runs just fine on older hardware.

Instead of upgrading the available HP laptop from Windows Vista Business to latest Windows 10 I decided to install Xubuntu 17.04 originally. Some weeks back, I then upgraded their machine to Bionic Beaver (version 18.04) already, and they can "beta-test" the upcoming Ubuntu LTS version.

After all, as more and more software is moved towards web applications it really doesn't matter anymore whether Firefox is run under Windows or Linux, does it? Additionally, they have access to LibreOffice, GIMP and other educational software packages like GCompris, and so forth.

Well, the children's exercise book is explicitly covering Windows, some applications of the Microsoft Office suite as well as Paint.net - software that isn't available on Linux out of the box.

Various approaches possible

Of course, there is no golden solution to this situation and multiple possibilities are given. All depending on circumstances, personal taste and eventual hardware constraints. Following, I would like to give you an overview of options - all of which I already used successfully in the past.

Virtualisation

This might come first in someone's mind and I have to agree with that. Installing a virtualisation software like Oracle VirtualBox, VMware Workstation or even qemu can be done easily and the the actual experience can be seamless. In our situation though is the existing hardware with a previous generation CPU and 2 GB RAM only the limiting factor to this approach.

Using wine or CodeWeavers CrossOver

Emulation software like wine or CodeWeavers CrossOver eliminate the necessity to install and run a complete virtualisation solution. The software provides an abstraction layer of native Windows API functionality and allows to install and run Windows software like the Microsoft Office suite among others directly on a Linux machine. Luckily, the hardware wouldn't be the limiting factor but I have to confess that it is my laziness to opt-in for this viable approach. Also, the first chapter in the kids' literature - Getting familiar with Windows - wouldn't be possible for them using this approach.

Remote access

Last but not least, providing remote access to an existing instance of a Windows system seems to be one of the easiest options. Here, the kids get to experience Windows directly and it doesn't need any resources on their Linux system. Using a software package like rdesktop or remmina enables a Linux user to connect to a Windows system via Remote Desktop Protocol (RDP). So far so good, but I'm not interested to provision a dedicated machine for this purpose at home. The system would be idle most of the time and consume a good chunk of electricity instead.

As mentioned earlier I have used all those approaches successfully, and it is good fun to tinker around with them. But those are most likely options for an adult and not really suitable for a child attending primary school.

A solution - Cloud-based virtual machine

Taking the pro aspects of each of the approaches earlier I decided to provision a virtual machine running Windows 10 Professional in the cloud. Access to that machine is available using RDP and in regards to hardware constraints it requires an internet connection only.

Actually, this suits me very well as it gives me control on various levels:

  • Local network: I can control at any time whether the kids' laptop gets access to our WiFi network or the internet based on simple authentication and routing configuration.
  • Operating times: A virtual machine in Azure is fully controlled through the Azure portal. I can decide when the VM is running and when not.
  • Hardware on demand: Provisioning hardware to the VM on Azure is just a few clicks and a reboot away.
  • Data exchange: Synchronisation of files between the local Linux laptop and the Windows machine in Azure is based on cloud storage providers like OneDrive, Google Drive, Dropbox, etc. Meaning backup of files is integrated and additional devices like their tablets can be added easily.

Later on, if the VM isn't needed anymore or in case the children totally messed it up I don't have to worry about anything. The VM gets decommissioned and can be provisioned again within minutes if needed.

Azure configuration and fine-tuning

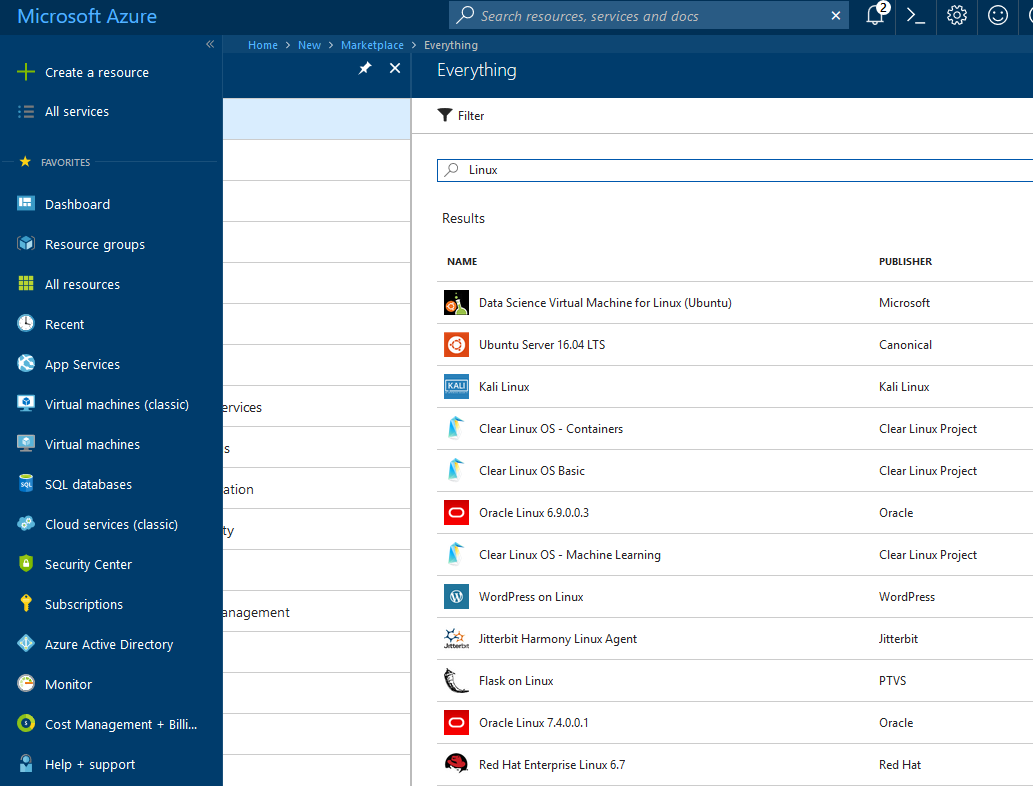
To start with this educational system for my children I went into the Azure Portal and created a new virtual machine using the Windows 10 Pro image. To keep nice and smooth I also created a new resource group to isolate it from other business-related activities.Given

Size of the VM

ICT skills at primary school
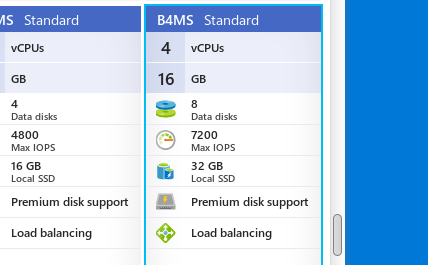
I chose a (hopefully) decent hardware setup running the virtual machine on a Standard B4MS (4 cores with 16 GB RAM) tier. This should be sufficient enough for Microsoft Office, Paint.net and Firefox.

Auto-shutdown

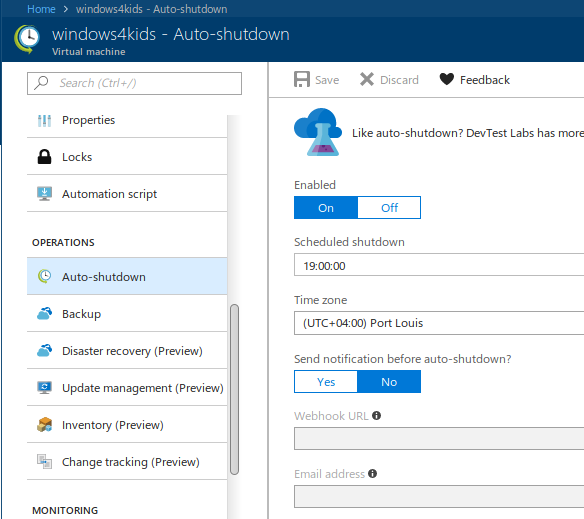
Also, I activated the Auto-shutdown feature which restricts the use of the system until a specified time, and helps me to save a heap of money, too.
ICT skills at primary school
The main purpose of that VM is to allow the children to follow the exercises and steps in their school book. At the given time the system simply shuts down, and it's dinner time in the off-line world.

Starting the VM

Now that we know how to stop the VM we should have a look about how to start it. There are multiple choices available. Most obvious you can launch the virtual machine via the Azure Portal itself. Nothing surprising here.

Next, Microsoft offers the free Azure mobile app for Android and iOS to stay connected to your Azure resources. This is quite neat to manage, monitor and operate Azure on the go.

And then there is azure-cli - the Command-line tools for Azure - which gives you the next generation multi-platform command line experience for Azure.

$ az 

     /\
    /  \    _____   _ _  ___ _
   / /\ \  |_  / | | | \'__/ _\
  / ____ \  / /| |_| | | |  __/
 /_/    \_\/___|\__,_|_|  \___|


Welcome to the cool new Azure CLI!

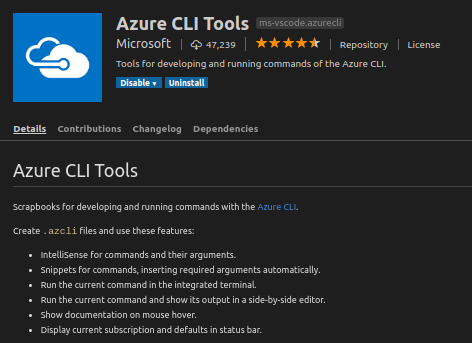
Usually, I have Visual Studio Code open almost the whole day and starting the kids' virtual machine is done using the Azure CLI Tools extension.
ICT skills at primary school

I'm currently using the following .azcli file to manage that VM:

# Logging into Azure
az login

# Starting kids' VM on Azure
az vm start -g Personal -n windows4kids

# Stopping kids' VM
az vm stop -g Personal -n windows4kids --no-wait

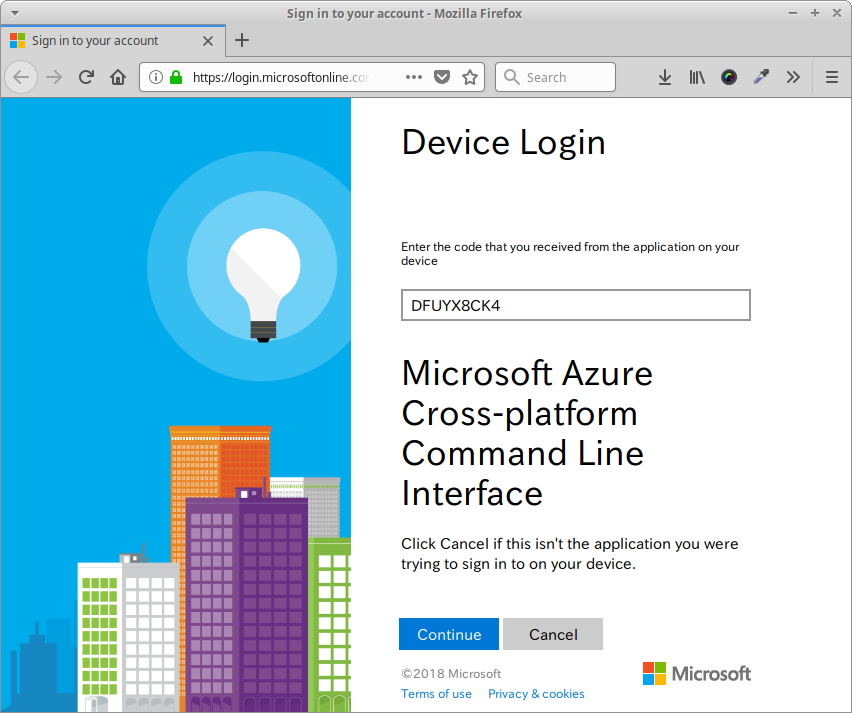
The az login triggers the device login on Azure and after entering a generated code to authenticate your machine you get access to your resources on Azure, like this:
ICT skills at primary school

Accessing the VM

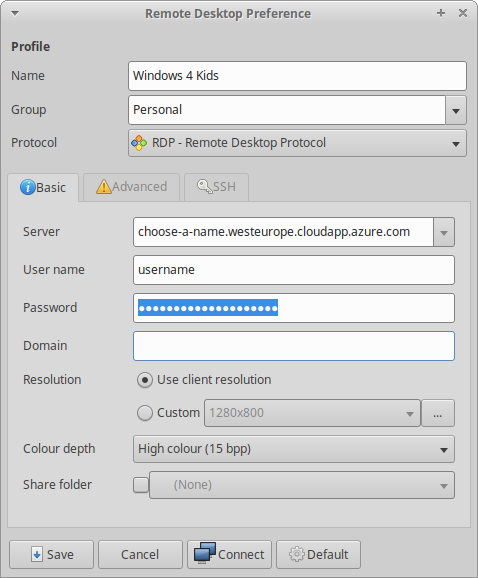
Windows machines on Azure are accessed via RDP and Linux has a variety of client applications for that protocol. In the portal you should assign a static domain name to your VM as the public IP address is most likely to change between daily uses. The portal allows you to download the Connect parameters as a .rdp file that you can open in any text editor on Linux.

ICT skills at primary school
Using the details from the .rdp it is possible to set up a new connection in remmina for future use. I'm storing the password to keep it simple for the children to access their new Windows machine.

Now, remmina is configured to start automatically after they logged into their account and the Windows VM on Azure is easy accessible via shortcut from the system tray area.

Give it a try - Azure free credit

Microsoft gives new sign-ups on Azure an initial credit that allows you to explore the various options and get yourself familiar with the available resources. Why don't you give it a try?

Ghost Desktop on Xubuntu 17.04 won’t start

Ghost Desktop on Xubuntu 17.04 won't start

Already before the migration from Joomla to Ghost last weekend I run the Ghost Desktop application on Windows. Now, after the successful completion it was about time to get going on my other machines. You know, the ones away from the main rig... Usually used during the evening hours, just for fun, or experimenting.

Tonight, I decided to give one of my Linux systems some attention, started to upgrade some packages, and installed new software. Among those also Ghost Desktop App for Linux. On the Ghost website you get version 1.3.0 (as of writing), and it's a Debian package.

Knowing that the desktop app is an Electron-based application, and I already packaged a few Electron apps myself, it would run on any Ubuntu-based system, too.
Note: This post was written in Ghost Desktop running on Xubuntu 17.04 64bit

Installation of Ghost Desktop

Either you double-click on the downloaded .deb package and your system will prompt you to open/install the application in Software, or you can run the following command in the Terminal:

$ sudo dpkg -i ~/Downloads/ghost-desktop-1.3.0-debian.deb 

Ghost Desktop can then be launched via the Application Menu/Launcher under ghost-desktop or if you prefer the terminal:

$ Ghost

The problem: Ghost Desktop won't start

If you try to launch the application via the menu or any other GUI launcher you won't get any response at all. The software just isn't executed, it seems.

Compared to running it in the Terminal. This might produce the following output:

$ Ghost
A JavaScript error occurred in the main process
Uncaught Exception:
Error: Unable to find a valid app
    at Object.<anonymous> (/usr/lib/Ghost/resources/electron.asar/browser/init.js:121:9)
    at Object.<anonymous> (/usr/lib/Ghost/resources/electron.asar/browser/init.js:173:3)
    at Module._compile (module.js:571:32)
    at Object.Module._extensions..js (module.js:580:10)
    at Module.load (module.js:488:32)
    at tryModuleLoad (module.js:447:12)
    at Function.Module._load (module.js:439:3)
    at Module.runMain (module.js:605:10)
    at run (bootstrap_node.js:424:7)
    at startup (bootstrap_node.js:147:9)

The solution: Set permissions

Fortunately, this has been reported already on GitHub by user letsjustfixit. The issue is caused by a missing permission bit on the Electron app. A temporary workaround has been documented until the package is going to be fixed.

Run the following chmod to set read and execute bits on the Electron app and dependent components. Then launch Ghost Desktop again.

$ sudo chmod -R +rx /usr/lib/Ghost/resources/app
$ Ghost 

 ⚡️  Welcome to Ghost  👻

Happy blogging!

It's great to see that such issues are handled on GitHub, and the "fix" is easily done.

As maintainer of own Electron-based applications I'm interested in the root cause. So far, I didn't come across a similar problem (touching wood!). Thankfully, I'm going to add this to my notes on Electron.

If you're familiar with this kind of problem regarding Electron packaging on Linux, give it try to fix it. On my side, I already cloned the Ghost-Desktop repository. Let's see whether I'm able to create a pull request for the Ghost community.

Installing Visual Studio Code on Linux (Ubuntu)

Installing Visual Studio Code on Linux (Ubuntu)

During this year's //build conference Microsoft officially announced a new member of the Visual Studio series called Code. As described by several people already it is a HTML5, JavaScript/TypeScript based text editor hosted inside the Electron shell and it runs natively on Windows, Mac OS X and Linux. This article hopefully gives you some ideas during installation and assistance to have an improved experience out of the box compared to the standard option - at least at the time of writing this article.

Getting Visual Studio Code

I started using Visual Studio Code since the first released version 0.1.0, and being part of the Insider Preview program for VS Code I managed to download and get the latest version always using this short-listed link:

https://aka.ms/vscode

Which is an alias for this web address: https://code.visualstudio.com/
Installing Visual Studio Code on Linux (Ubuntu)
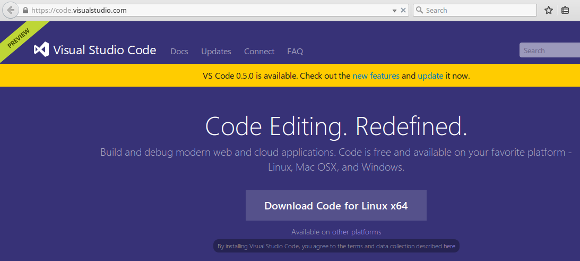
Get the latest version of Visual Studio Code from the web site

Microsoft's web site of Code detects your operating system and directly offers you the best download option based on your current browser. I'm currently running Xubuntu 15.04 x64 - Vivid Vervet and the site offers me a direct link to get the latest 64-bit version of Visual Studio Code. In case that you'd like to download a different version please scroll down to the bottom of the site and check the additional options.

Note: Originally, I started using Code 0.1.0 on Xubuntu 14.10 and then upgraded my machine around mid of May. Also, on a different machine running Ubuntu 14.04 LTS I can confirm to use Visual Studio Code successfully.

Unzip the archive

After you downloaded the latest ZIP archive for your architecture, here: VSCode-linux-x64.zip, you should decide where to extract the content of the compressed file. Well, in my case, I'd like to have third party products below the appropriate location, and therefore I usually choose /opt. Eventually you might ask yourself why? Well, here's a decent chapter about the Linux Filesystem Hierarchy written by The Linux Documentation Project (TLDP):

1.13 /opt

This directory is reserved for all the software and add-on packages that are not part of the default installation. For example, StarOffice, Kylix, Netscape Communicator and WordPerfect packages are normally found here. To comply with the FSSTND, all third party applications should be installed in this directory. Any package to be installed here must locate its static files (ie. extra fonts, clipart, database files) must locate its static files in a separate /opt/'package' or /opt/'provider' directory tree (similar to the way in which Windows will install new software to its own directory tree C:\Windows\Progam Files\"Program Name"), where 'package' is a name that describes the software package and 'provider' is the provider's LANANA registered name.

Looks good to me, or?

Anyway, let's just use this as base - given that you're root on the machine - it's surely a good choice, otherwise feel free to unzip the archive in your personal user space below your home directory. Next, let's extract the content as suggested using the console (or terminal in case that you'd prefer this term):

$ cd /opt
/opt$ sudo unzip ~/Downloads/VSCode-linux-x64.zip

This is going to create a new directory VSCode-linux-x64 which contains the static binary to run Visual Studio Code on your system. Right now, you would be able to launch the text editor by executing the following command:

/opt$ ./VSCode-linux-x64/Code

Despite some warnings and errors on the console output, similar to those:

[3437:0724/220852:ERROR:browser_main_loop.cc(173)] Running without the SUID sandbox! See https://code.google.com/p/chromium/wiki/LinuxSUIDSandboxDevelopment for more information on developing with the sandbox on.
bash: cannot set terminal process group (-1): Inappropriate ioctl for device
bash: no job control in this shell

Visual Studio Code is up and running...

Installing Visual Studio Code on Linux (Ubuntu)
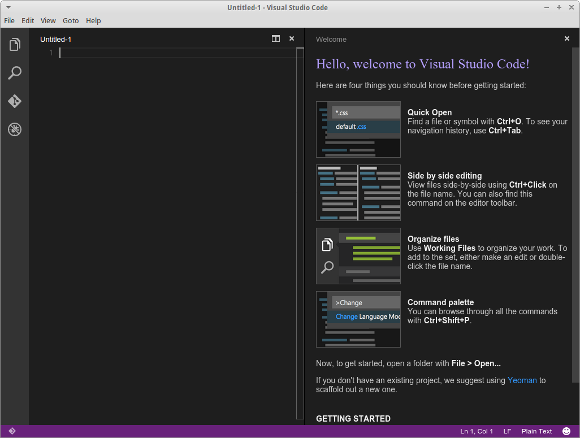
Welcome screen of Visual Studio Code on first start of the text editor

Adding a little bit more comfort

Hopefully, you were able to launch Visual Studio Code based on the description given above. Now, let's add a little bit more comfort to your user experience. Unfortunately, there is no out-of-the-box installation package for the usual distributions - at least not yet, and we are obliged to do some manual steps. Following, I'm going to give you my steps with some brief explanations about the why and how. Of course, there are always multiple choices and you might either skip one or the other step or even have better suggestions. Please use the comment section at the bottom to give me your tips & tricks. Thanks!

Version-(in)dependent folder and symbolic link

Not sure about you but given the manual installation steps I would like to have a better control each time I consider to install a newer version of Code. Also, this helps to keep some adjustments on constant path information like Application launcher and shortcuts to run Visual Studio Code. Okay, let's dig into that and first rename (move) the base directory of Code to a version-specific one:

/opt$ sudo mv VSCode-linux-x64 VSCode-0.5.0

Again, as of writing this article 0.5.0 was the latest available version. Meanwhile, the are good chances that you might have a higher version already - good! Next, I usually create a symbolic soft link back to the newly renamed folder in order to stay version-independent. Sounds confusing, right? Hold on, I'll explain it in a short, and you will see the benefits, too.

/opt$ sudo ln -s VSCode-0.5.0 VSCode

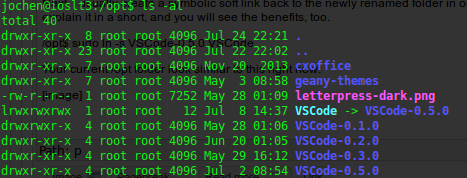
Your own /opt folder might look similar to this one right now:
Installing Visual Studio Code on Linux (Ubuntu)
Extract the Visual Studio Code zip archive below /opt directory and create a version-independent symlink

As you can see on the screenshot I've been using Code since the very beginning, and using this approach I am actually able to keep all versions installed side-by-side next to each other. The most interesting part is the version-independent symlink in the /opt directory. This allows me to launch Visual Studio Code by executing the following line from anywhere:

/opt/VSCode/Code

Like using the Application Finder on Xubuntu after pressing Alt+F2:

Installing Visual Studio Code on Linux (Ubuntu)
Launch Visual Studio Code from the Application Finder with fully qualified path to executable

This scenario gives us a good head start for further activities.

The power of PATH

Now that we have a "fixed" location for Visual Studio Code, it would be more comfortable to avoid to specify the full path information each time that we would like to launch the text editor. Also, looking to some of the cool command line options of Code on other platforms, it would be nice to have them as well on Linux. Okay, then let's do it using the PATH environment variable. The Linux Information Project has a good definition online:

PATH Definition

PATH is an environmental variable in Linux and other Unix-like operating systems that tells the shell which directories to search for executable files (i.e., ready-to-run programs) in response to commands issued by a user. It increases both the convenience and the safety of such operating systems and is widely considered to be the single most important environmental variable.

That sounds exactly like what we are looking for. And in compliance with other operating systems, we are going to create another symlink for our purpose, like this:

~$ sudo ln -s /opt/VSCode/Code /usr/local/bin/code

Changing the letter casing of the executable from proper writing - Code - to lower case writing - code - isn't a typo actually.

Update: Recently, I discovered that the official guide on Setting up Visual Studio Code on Linux also mentions the creation of a symlink as a tip.

Commonly, UNIX and Linux commands are written in lower-case writing anyway, so why should we break with this tradition? Of course, you will be able to launch the text editor now with this new path, too. Either on the console / terminal, like so

~$ code

or using the Application Finder - the choice is yours.

Installing Visual Studio Code on Linux (Ubuntu)
Launch Visual Studio Code from the Application Finder

Thanks to the PATH environment variable we can now completely omit the path information. Linux knows where to find our executable now.

Application launcher in Main Menu

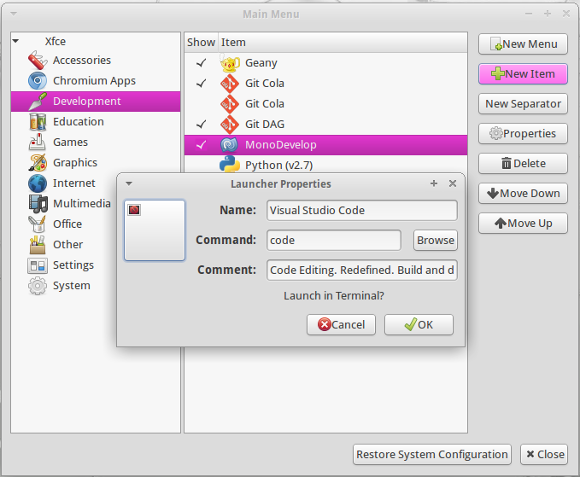
Being able to start Visual Studio Code anywhere from the console has already given us some comfort but compared to Windows and Mac OS X users we are still living in the digital stone age, and no application is fully installed on your Linux OS without an application launcher in your main menu. In Xubuntu you would open Application Menu (or press Alt+F1) - Settings - Main Menu in order to add a new launcher to the menu. In the menu editor select the Development section or any other where you would like to place the launcher and click on New Item to define the Launcher Properties. Eventually, you might like to enter the following on your machine:

Installing Visual Studio Code on Linux (Ubuntu)
Add a new item to the main menu for Visual Studio Code

Unfortunately, this leaves us with an empty icon for now. Quickly open a new terminal and switch to an existing one and let's see which graphics are provided by Microsoft, like so:

~$ find /opt/VSCode/* -type f -iname '*.png'
/opt/VSCode/resources/app/vso.png
/opt/VSCode/resources/app/client/vs/base/ui/scrollbar/impl/arrow-up.png
/opt/VSCode/resources/app/client/vs/base/ui/scrollbar/impl/arrow-left.png
/opt/VSCode/resources/app/client/vs/base/ui/scrollbar/impl/arrow-right.png
/opt/VSCode/resources/app/client/vs/base/ui/scrollbar/impl/arrow-right-dark.png
/opt/VSCode/resources/app/client/vs/base/ui/scrollbar/impl/arrow-left-dark.png
/opt/VSCode/resources/app/client/vs/base/ui/scrollbar/impl/arrow-down-dark.png
/opt/VSCode/resources/app/client/vs/base/ui/scrollbar/impl/arrow-down.png
/opt/VSCode/resources/app/client/vs/base/ui/scrollbar/impl/arrow-up-dark.png
/opt/VSCode/resources/app/client/vs/editor/diff/diagonal-fill.png
/opt/VSCode/resources/app/client/vs/editor/css/arrow-left.png
/opt/VSCode/resources/app/client/vs/editor/css/arrow-right.png
/opt/VSCode/resources/app/client/vs/workbench/contrib/daytona/TestPlugin/Resources/Images.png
/opt/VSCode/resources/app/client/vs/workbench/contrib/daytona/TestPlugin/Images/FileIdentifier.png
/opt/VSCode/resources/app/client/vs/workbench/contrib/daytona/TestPlugin/Images/icon2.png
/opt/VSCode/resources/app/client/vs/workbench/contrib/daytona/TestPlugin/Images/icon3.png
/opt/VSCode/resources/app/client/vs/workbench/contrib/daytona/TestPlugin/Images/icon1.png
/opt/VSCode/resources/app/client/vs/workbench/contrib/daytona/TestPlugin/Images/console-icons.png
/opt/VSCode/resources/app/client/vs/workbench/ui/parts/editor/media/letterpress.png
/opt/VSCode/resources/app/client/vs/workbench/ui/parts/editor/media/[email protected]
/opt/VSCode/resources/app/client/vs/workbench/ui/parts/editor/media/letterpress-dark.png
/opt/VSCode/resources/app/client/vs/workbench/ui/parts/editor/media/[email protected]
/opt/VSCode/resources/app/node_modules/emmet/Icon.png

Alternatively, you might also have a look at the SVG graphics provided by Visual Studio Code.

I chose the vso.png and to simplify my life in regards of future upgrades and unexpected changes, I placed a copy of the graphic file into the usual location on a Linux system:

~$ sudo cp /opt/VSCode/resources/app/vso.png /usr/share/icons/

Hint: Use the Move option in the window menu to relocate the dialog using the arrow keys, and then confirm your selection with a click on the OK button of the dialog.

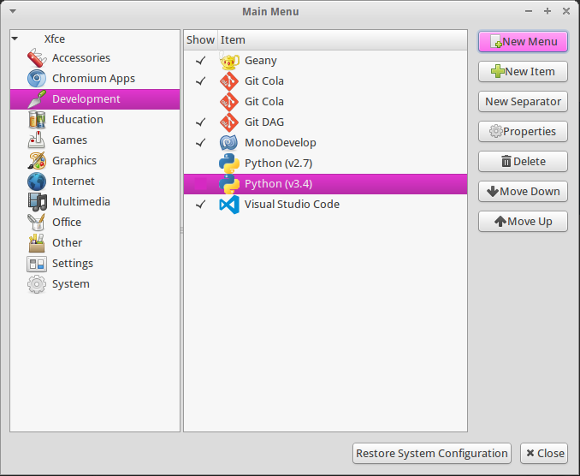
Your Main Menu editor might look like this now:
Installing Visual Studio Code on Linux (Ubuntu)
Visual Studio Code as proper entry in the main menu of Xubuntu

Congratulations, your new application launcher has been added to the menu and you can either navigate into the Development section (or the one you chose) or type your choice into the application quick filter textbox to find and execute Visual Studio Code.
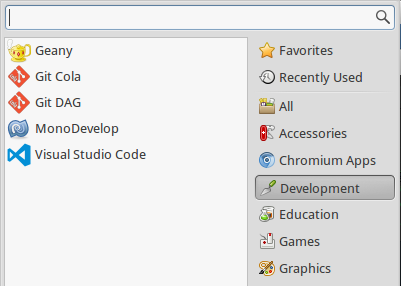
Installing Visual Studio Code on Linux (Ubuntu)
Navigate the application menu to launch Visual Studio Code

Installing Visual Studio Code on Linux (Ubuntu)
Use the quick filter entry of the application menu to launch Visual Studio Code

Creating a Desktop Entry file

As we are working with Linux there are always multiple ways to achieve the same or similar result. And eventually you might prefer the possibility to create and use a file-based application launcher which adds itself to the menu structure automatically. Creating a .desktop file is not too challenging and requires a simple text editor - like Visual Studio Code ;-) - to write the following definition into it:

[Desktop Entry]
Version=1.0
Encoding=UTF-8
Name=Visual Studio Code
GenericName=Integrated Development Environment
Comment=Code Editing. Redefined. Build and debug modern web and cloud applications.
Exec=code
TryExec=code
Icon=vso
StartupNotify=true
Terminal=false
Type=Application
MimeType=text/x-csharp;application/x-mds;application/x-mdp;application/x-cmbx;application/x-prjx;application/x-csproj;application/x-vbproj;application/x-sln;application/x-aspx;text/xml;application/xhtml+xml;text/html;text/plain;
Categories=GNOME;GTK;Development;IDE;

Save it as vscode.desktop and then put this file into the appropriate location for a Linux system:

~$ sudo cp vscode.desktop /usr/share/applications/vscode.desktop

Thanks to the proper location of the shared icon and the symlinks we created earlier, we do not have to specify any absolute paths in our Desktop Entry file. As soon as the file has been copied below the shared applications folder it automatically appears in your main menu and is ready to be used.

For your extra comfort you might like to download the vscode.desktop file. You will have to rename the file and place it accordingly on your system.

Make it a launcher in Cairo Dock

As for the different options of Ubuntu I have to admit that I'm a long-year user of the Xfce environment, called Xubuntu, and on top I also like using a flexible dock panel (or two or three). Cairo dock is a fantastic package in case that you would like to have a little bit of Mac OS X flavour on your Linux desktop, and adding a launcher for Visual Studio Code is very simply to do.

Installing Visual Studio Code on Linux (Ubuntu)
Add Visual Studio Code to a dock panel like cairo dock or similar

First, run Visual Studio Code using one of the previously described methods. Next, after the application runs and an icon of code appears in the dock panel right-click the icon, then select the sub-menu entry "Make it a launcher" from the "code" context menu entry and you're done. That's actually similar to pinning an application to the taskbar in Windows 7, Windows 8 or Windows 10. Close the text editor and your new launcher will still remain in the dock panel.

Resume on installing Visual Studio Code

Without any question it is fantastic to have an identical text editor for all three major operating system. But Linux users are currently confronted with some lack of comfort compared to their Windows and Mac OS X friends. Although there are several and in my opinion easy ways to increase the user experience in using Visual Studio Code under Linux I'm a bit concerned whether Microsoft is keeping it on par to the other systems. Right now, installation takes some manual steps, there are essential parts missing in order to provide an excellent first contact and other editor features like automatic updates aren't yet available for the Linux variation compared to Windows and Mac OS X.

Bearing in mind that the product has been launched back in April/May this year only and we are currently on version 0.5.0, I am very interested in the future development. The documentation online has some neat features for you, and the team at Microsoft has an open ear to the feedback and wishes given on their UserVoice website, too.

That's all for the installation part of Visual Studio Code. Please leave your comments as well as tips & tricks for me.

Happy coding!

Ubuntu Jam at the University of Mauritius

Ubuntu Jam at the University of Mauritius

Operating systems are simply tools to do a job...

And therefore, I have to admit that even though I use Microsoft Windows on a daily base to earn my living, I'm also using Linux since almost two decades on various machines. Together with different types of virtualisation I actually do not care whether an OS is running on bare-metal or inside a virtual machine. And given the computing power of recent machines it's not a question after all anymore. Given this little insight, let's directly hop into the Ubuntu Jam event from February 2015.

Saturday is usually the time the children are on tour with me and so why not take them to the University of Mauritius and have some fun together. Also, they know quite a number of folks of the Linux User Group of Mauritius, too. When we arrived at the campus it was actually simple to get a proper parking - just speak to the security guys around POWA, they are actually very friendly and willing to help. ;-)

Next, we had to look for those Linux geeks and penguins... Near the cafeteria they said, as if I know where the cafeteria is. Frankly, it was on our direct way to ask a group of students. Even though they gave us a strange but curious look, they were really glad to help and we managed to be around in time. Well, even too early... Anyway, enough time to get our gear in place. Even though that my dear son was more busy with his Nintendo DS than a Linux-driven laptop but hey that's absolutely fine. He's already geeky enough. Actually, later on - I don't know he managed it - he was gaming on someone else's Android smartphone.

Disclaimer: I won't be accountable for any hacks and root kit installations on your device that he's going to do!

So better keep your smartphone under your control. Anyway, it seems that the phone owner and my son had a good time checking out some gaming apps. This gave me a bit of liberty to show my older laptop running on Xubuntu 14.10, to answer a couple of Xfce4 related questions and to advertise the Developers Conference. Yes, I keep a git clone on that machine, too - actually running on different TCP ports on Apache and nginx simultaneously. Geeky style... 

Ubuntu Jam at the University of Mauritius
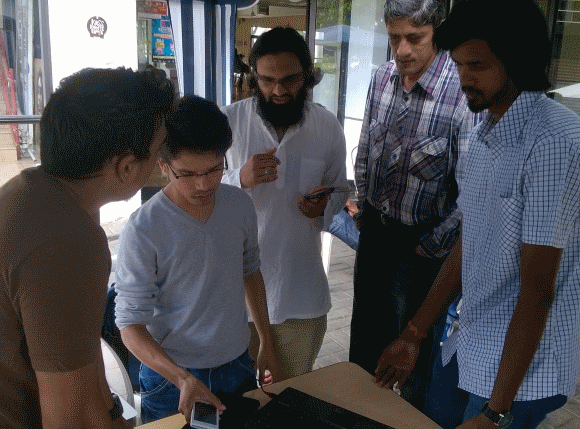
Lots of hardware and software during the Ubuntu Jam - and the choice of tools covered a wide range...

Ubuntu Jam at the University of Mauritius
Despite some light spray of rain, we had a great time during the Ubuntu Jam at the University of Mauritius (UoM)

Thanks to the vicinity of the UoM cafeteria it was a no-brainer to just get inside and grab some drinks and food for the lunch-break. Quite surprisingly, they also offer power drinks and other selections. Now, again well fed and still ambitious to handle Linux questions, I managed to get some exchange with Ish, Nirvan, Nadim, Pritvi and others regarding the organisation and ideas for the DevCon. Even though that there was a slight spray of rain, it seems that we all had a good time on the campus and I'm looking forward to attend the next Linux Jam - maybe then on openSUSE Leap or other distributions.