Category Archives: Development

Installing SQL Server 2019 and tools on Ubuntu 20.04

Installing SQL Server 2019 and tools on Ubuntu 20.04

Why writing a blog article about the installation of Microsoft SQL Server 2019, related command-line tools, and UI-based management solution despite the official documentation by Microsoft?

There are two main reasons:

  • For own purpose and reference with some additional hints
  • The official documentation seems to be "out-of-sync"

Perhaps reading the official articles Quickstart: Install SQL Server and create a database on Ubuntu and Install the SQL Server command-line tools sqlcmd and bcp on Linux in the Microsoft documentation might be a pre-requisite to the following content.

And the article Installation guidance for SQL Server on Linux provides guidance for installing, updating, and uninstalling SQL Server 2019 on Linux.

However, as mentioned, some information feels out of picture or eventually outdated given existence of newer versions of the referenced applications.

Prepare your system

Before we shall start with the installation of SQL Server 2019, command-line tools and related management software let's be sure that our local system is up-to-date and has the needed packages already installed.

Open a terminal to run the following commands. First one is going to update your local package cache. The second one installs the curl package which we are going to need for future commands.

sudo apt-get update
sudo apt install curl libxss1 libgconf-2-4 libunwind8

Next, import the public repository GPG keys.

curl https://packages.microsoft.com/keys/microsoft.asc | sudo apt-key add -

Don't ignore the trailing dash (-) in the command above. It is essential and therefore necessary. Alternatively this could have been done using wget like so.

wget -qO- https://packages.microsoft.com/keys/microsoft.asc | sudo apt-key add -

Same handling for the trailing dash (-) applies.

Get the packages

Now that the local system has been prepared it is time to get the actual software packages for SQL Server 2019 and command-line tools.

To be able to install SQL Server 2019 use one of the following commands in order to add the package repository.

sudo add-apt-repository "$(wget -qO- https://packages.microsoft.com/config/ubuntu/20.04/mssql-server-2019.list)"
curl https://packages.microsoft.com/config/ubuntu/20.04/mssql-server-2019.list | sudo tee /etc/apt/sources.list.d/mssql-server-2019.list

Then add the package repository for the command-line tools provided by Microsoft accordingly.

curl https://packages.microsoft.com/config/ubuntu/20.04/prod.list | sudo tee /etc/apt/sources.list.d/msprod.list

Alternatively the information of each package repository could be used directly. Here are the corresponding entries for the sources and some more.

# SQL Server 2019
deb [arch=amd64,armhf,arm64] https://packages.microsoft.com/ubuntu/20.04/mssql-server-2019 focal main
# SQL command-line tools as part of the "productivity collection"
deb [arch=amd64,armhf,arm64] https://packages.microsoft.com/ubuntu/20.04/prod focal main

# A few additional Microsoft repos for reference...
# Edge
deb [arch=amd64] http://packages.microsoft.com/repos/edge/ stable main
# Azure CLI
deb [arch=amd64] https://packages.microsoft.com/repos/azure-cli/ focal main
# Visual Studio Code
deb [arch=amd64,arm64,armhf] http://packages.microsoft.com/repos/code stable main

Maybe you prefer to store all Microsoft package sources in one single microsoft.list file rather than having multiple ones.

I highly recommend to read Configure repositories for installing and upgrading SQL Server on Linux for more details on available product options and upgrade channels of SQL Server.

With the newly added repositories for apt it is time again to update the local package cache and to fill it with details about the new packages available.

sudo apt update

After successful update of the package cache you are able to search it for SQL Server related packages, like so.

apt search mssql

Or if you prefer less details, like this.

apt list mssql*
Installing SQL Server 2019 and tools on Ubuntu 20.04

The output of the command above is going to give a list of available packages for SQL Server 2019. Your choice might be different but I'm going to install the actual database engine, with full-text search, the latest command-line tools, and additionally ODBC driver support for Unix/Linux systems.

sudo apt install -y mssql-server mssql-server-fts mssql-tools18 unixodbc-dev

All necessary dependencies will be resolved and installed by apt.

After the installation SQL Server 2019 is not yet running on your system. Run mssql-conf setup command and follow the prompts to choose your edition and set the password of the super-administrator (sa) account.

sudo /opt/mssql/bin/mssql-conf setup accept-eula

After completing the setup, verify that the service is running as expected.

systemctl status mssql-server --no-pager
Installing SQL Server 2019 and tools on Ubuntu 20.04

Finally, add the SQL Server tools to the path by default.

echo 'export PATH="$PATH:/opt/mssql-tools18/bin"' >> ~/.bash_profile
echo 'export PATH="$PATH:/opt/mssql-tools18/bin"' >> ~/.bashrc
source ~/.bashrc

Is it running?

Good question. Let's try and find out. The command-line tools of SQL Server 2019 comes with sqlcmd. The SQL Server command line tool which allows you to connect to local and remote instances of SQL Server including Azure SQL. Run the following to query the product version and edition of your installation.

sqlcmd -S localhost -C -U SA -Q "SELECT @@VERSION"

You will be prompted to enter the password of SA. If you are not familiar with the various command line switches, run sqlcmd -? to get a quick overview.

The resulting output should look similar to this.

Installing SQL Server 2019 and tools on Ubuntu 20.04

Congratulations!

All those steps could be merged into one script to simplify and eventually automate the installation of SQL Server 2019 and its command-line tools. Interestingly the Microsoft documentation has an article on that matter.

Unattended install for SQL Server on Ubuntu - SQL Server
Learn to use a sample Bash script to install SQL Server 2017 on Ubuntu 16.04 without interactive input.
Installing SQL Server 2019 and tools on Ubuntu 20.04

However the presented bash script needs some serious TLC and updates. I suggest that you have look and take it as a starting point only, if needed.

Missing SQL Server Management Studio?

While working with SQL Server on a Windows system the common choice would be SQL Server Management Studio (SSMS) in order to connect to the database server / instance and the database itself. Unfortunately, SQL Server Management Studio is not available on Linux. And probably won't be in the near (and far) future.

There are at least two possibilities to replace SQL Server Management Studio which offer sufficient and similar comfort on Linux.

  • Visual Studio Code with SQL Server (mssql) extension
  • Azure Data Studio
Installing SQL Server 2019 and tools on Ubuntu 20.04
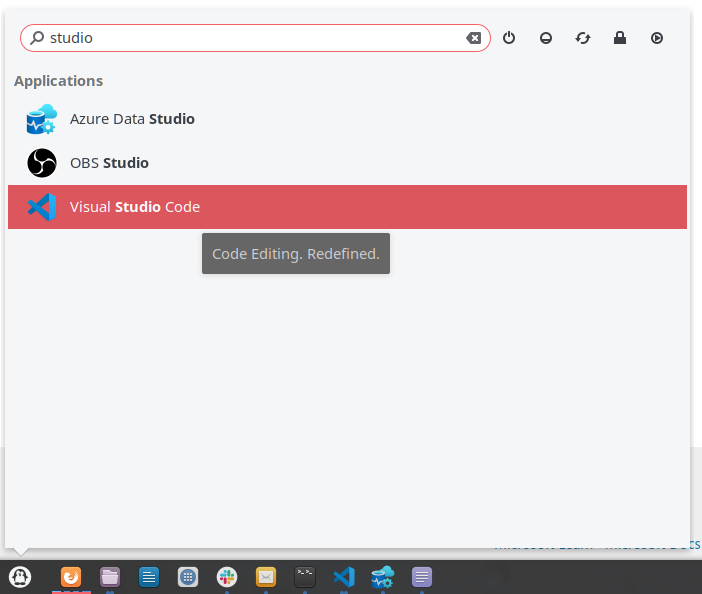
Azure Data Studio and Visual Studio Code shown in the application menu

Both applications have their pros and cons. If you are already developing and writing code in Visual Studio Code you might probably prefer to use the extension and to stay within the same window. In case that you are more into SQL Server handling and Azure you might opt-in for Data Studio.

Download and install Azure Data Studio following this article.

Download and install Azure Data Studio - Azure Data Studio
Download and install Azure Data Studio for Windows, macOS, or Linux. This article provides release dates, version numbers, system requirements, and download links.
Installing SQL Server 2019 and tools on Ubuntu 20.04

Then launch the application via Application menu or run azuredatastudio in a terminal.

Installing SQL Server 2019 and tools on Ubuntu 20.04
Add a connection to a local instance of SQL Server in Azure Data Studio
Installing SQL Server 2019 and tools on Ubuntu 20.04
Azure Data Studio connected to local instance of SQL Server 2019

Install Visual Studio Code using apt.

sudo apt install -y code

Then launch the application via menu or run code in a terminal.

Installing SQL Server 2019 and tools on Ubuntu 20.04
SQL Server (mssql) extension in Visual Studio Code

More details on SQL Server tools can be found here.

SQL tools overview - SQL Server
SQL query and management tools for SQL Server, Azure SQL (Azure SQL database, Azure SQL managed instance, SQL virtual machines), and Azure Synapse Analytics.
Installing SQL Server 2019 and tools on Ubuntu 20.04
Image credit: Leif Christoph Gottwald

Using Apache HTTP as reverse proxy

Using Apache HTTP as reverse proxy

The Apache HTTP Server, colloquially called Apache, is a free and open-source cross-platform web server. This article explains briefly how to set up Apache as a reverse proxy to a web site in an internal network.

To set the expectations in this article. I'm not going to explain you how to install Apache web server or how to get it operational on your system. There are thousands of tutorials including my own Accessing your web server via IPv6 on the Internet that already cover that step.

In case more information about the configuration directives used below is needed, I recommend to consult the official documentation of a particular keyword.

The scenario

I have a web site running on a system in an internal network. This could be either a full-fledged Windows/Linux server or an IoT device running on a single board computer (SBC), like i.e. a Raspberry Pi, an Arduino, ESP8266 chipset.

Using Apache HTTP as reverse proxy
A reverse proxy taking requests from the Internet and forwarding them to servers in an internal network. Source: Wikipedia

Now, I want to enable access from the Internet to that internal server using Apache.

Configuring Apache as reverse proxy

In order to complete our task we need to look into the features of the mod_proxy module for Apache. Here, we get a directive called ProxyPass which does the job as expected. According to Apache's Reverse Proxy Guide the simplest example proxies all requests ("/") to a single backend:

ProxyPass "/"  "http://www.example.com/"

Additionally, to hide any reference to the system on the internal network it is required to specify the directive ProxyPassReverse to modify certain HTTP header values in the response, and use the proxy data instead.

Following is a working example of how to set up a virtual host in Apache that provides reverse proxy capabilities.

<VirtualHost *:80>
        ServerName mediacentre.kirstaetter.name

        ProxyRequests On
        ProxyPreserveHost On
        ProxyVia full

        <Proxy *>
                Order deny,allow
                Allow from all
        </Proxy>

        ProxyPass               /       http://10.0.240.4:8080/
        ProxyPassReverse        /       http://10.0.240.4:8080/
</VirtualHost>

The host system on IP address 10.0.240.4 is part of an OpenVPN infrastructure and therefore accessible from the proxy system.

Multiple proxies possible

No problem with Apache. You can configure and run as many reverse proxies as would like to. One has to pay attention to avoid overlaps either via ServerName directive or by using different port numbers to bind to. Although I have only one reverse proxy running on Apache I configured multiple scenarios using nginx. More details are described in Using nginx as reverse proxy.

Do you have any interesting use cases or active configurations of Apache as reverse proxy? If yes, please use the comment section below give me and other readers more details. Thanks!

Image credit: Nick Fewing

Using nginx as reverse proxy

Using nginx as reverse proxy

Nginx (read: engine-x) has versatile options to set up web sites and more advanced configurations. This article explains briefly how to set up nginx as a reverse proxy to a web site in an internal network.

NGINX is a free, open-source, high-performance HTTP server and reverse proxy, as well as an IMAP/POP3 proxy server. Source: https://www.nginx.com/resources/wiki/

The scenario

I have a web site running on a system in an internal network. This could be either a full-fledged Windows/Linux server or an IoT device running on a single board computer (SBC), like i.e. a Raspberry Pi, an Arduino, ESP8266 chipset.

Using nginx as reverse proxy
A reverse proxy taking requests from the Internet and forwarding them to servers in an internal network. Source: Wikipedia

Now, I want to enable access from the Internet to that internal server using nginx.

Setting up nginx

In order to set up the solution you need to have a public facing web server on the Internet. Most probably it already runs nginx to serve your web site or blogging software.

I'm running a root server on Debian/GNU Linux and nginx is already installed. You can check your own system quickly like so for any running process:

$ ps fax | grep nginx

Or if you prefer a bit more details like so:

$ sudo service nginx status
● nginx.service - A high performance web server and a reverse proxy server
   Loaded: loaded (/lib/systemd/system/nginx.service; enabled)
   Active: active (running) since Do 2019-01-03 03:28:11 CET; 4 days ago
     Docs: man:nginx(8)
  Process: 29505 ExecStop=/sbin/start-stop-daemon --quiet --stop --retry QUIT/5 --pidfile /run/nginx.pid (code=exited, status=0/SUCCESS)
  Process: 29537 ExecStart=/usr/sbin/nginx -g daemon on; master_process on; (code=exited, status=0/SUCCESS)
  Process: 29535 ExecStartPre=/usr/sbin/nginx -t -q -g daemon on; master_process on; (code=exited, status=0/SUCCESS)
 Main PID: 29539 (nginx)
   CGroup: /system.slice/nginx.service
           ├─29539 nginx: master process /usr/sbin/nginx -g daemon on; master_process on;
           ├─29540 nginx: worker process
           ├─29541 nginx: worker process
           ├─29542 nginx: worker process
           └─29543 nginx: worker process

In case that nginx is not even installed on your system you could look up the package information like so:

$ apt search ^nginx

And install the web server using apt-get like so:

$ sudo apt-get install nginx-full

Which will then install nginx web/proxy server and all its dependencies on your server.

Configuring nginx as reverse proxy

Now, we have an operational installation of nginx on our Internet-facing system. We are going to create a new configuration file that defines the necessary proxy information to access our service on the internal network.

First create a new file below nginx configuration folder using your preferred text editor.

$ cd /etc/nginx/sites-available/
$ sudo nano raspberry

The file name should be relevant to either the kind of services or the system that you are going to shield using nginx as proxy.

Next, write the following server definition into your configuration file. Of course, you would adjust the server name and the IP address according to your environment:

server {
    listen 80;
    listen [::]:80;
    
    server_name raspberry.kirstaetter.name;
    server_tokens off;

    location / {
        proxy_set_header X-Real-IP $remote_addr;
        proxy_pass 10.0.240.3;
    }
}

That is the minimal configuration you would have to specify in order to run nginx as a reverse proxy to a system on your internal network. The given IP address needs to be accessible from your public web server, i.e. using a VPN infrastructure based on OpenVPN.

After saving and closing the new nginx configuration it is time to enable and check the syntax for any errors. To enable an available configuration you need to either place it or link it into the folder sites-enabled of nginx.

$ cd ../sites-enabled
$ sudo ln -s /etc/nginx/sites-available/raspberry raspberry

Now, to avoid any unexpected shutdowns or better said launching issues you should always run a configuration test before restarting the nginx service. This can be done quickly using the following command:

$ sudo service nginx configtest
[ ok ] Testing nginx configuration:.

Should your configuration file have any unknown directives and errors the output of configtest looks like this:

$ sudo service nginx configtest
[FAIL] Testing nginx configuration: failed!

You will find more details about the nature of the problem and the line number in the error log file below /var/log, i.e. here:

$ sudo cat /var/log/nginx/error.log
2019/01/07 13:50:07 [emerg] 21662#21662: unknown directive "server_?name" in /etc/nginx/sites-enabled/raspberry:5

Only when all problems have been resolved and you have a positive response from the configtest you should restart the nginx service.

$ sudo service nginx restart

Resolve a domain name

The above described sample is very basic, and sometimes it might be necessary to avoid using an IP address for internal service. Luckily, this can configured using the resolver directive in an nginx configuration file like so:

server {
    listen 80;
    listen [::]:80;
    
    server_name raspberry.kirstaetter.name;
    server_tokens off;

    resolver 127.0.0.1;
    
    location / {
        proxy_set_header X-Real-IP $remote_addr;
        proxy_pass rasp01.local;
    }
}

The change in our configuration file now assumes that I have a DNS server running on the local machine which knows how to handle and resolve the specified domain name rasp01.local.

Again, this article covers the basics of reverse proxying using nginx only. There are more interesting scenario like setting your own DNS server on the internal network to provide public access to an internal resource.

Perhaps, you might want to proxy an existing service with your own custom domain, in case that the service provide does not offer this option. Using a public DNS server like Cloudflare's 1.1.1.1, Google Public DNS (8.8.8.8), or OpenDNS as resolver should give you some ideas.

Provide secure access using SSL

Let's take the following scenario into consideration. Your internal resource might not be configurable with an SSL certificate but you would like to enable HTTPS protocol communication from the Internet. Setting up nginx with an SSL certificate is well-documented and to combine this with the above described proxy features is a breeze to achieve.

Following you will get a more complete configuration file based on the previous example, now SSL-enabled using a Let's Encrypt certificate.

server {
    listen 80;
    listen [::]:80;
    listen 443 ssl http2;
    listen [::]:443 ssl http2;

    server_name raspberry.kirstaetter.name;
    server_tokens off;
    server_name_in_redirect off;

    client_max_body_size 50m;

    ssl on;
    ssl_certificate         /etc/letsencrypt/live/raspberry.kirstaetter.name/fullchain.pem;
    ssl_certificate_key     /etc/letsencrypt/live/raspberry.kirstaetter.name/privkey.pem;

    # modern configuration. tweak to your needs.
    ssl_protocols TLSv1 TLSv1.1 TLSv1.2;
    ssl_ciphers 'ECDHE-ECDSA-AES256-GCM-SHA384:ECDHE-RSA-AES256-GCM-SHA384:ECDHE-ECDSA-CHACHA20-POLY1305:ECDHE-RSA-CHACHA20-POLY1305:ECDHE-ECDSA-AES128-GCM-SHA256:ECDHE-RSA-AES128-GCM-SHA256:ECDHE-ECDSA-AES256-SHA384:ECDHE-RSA-AES256-SHA384:ECDHE-ECDSA-AES128-SHA256:ECDHE-RSA-AES128-SHA256';
    ssl_prefer_server_ciphers on;

    # HTTP headers
    add_header X-Content-Type-Options nosniff;
    add_header X-Frame-Options SAMEORIGIN;
    add_header X-XSS-Protection "1; mode=block";
    add_header Referrer-Policy no-referrer-when-downgrade;

    root /var/www/raspberry;
    access_log /var/log/nginx/raspberry.kirstaetter.name.access_log gzip;
    error_log /var/log/nginx/raspberry.kirstaetter.name.error_log info;

    resolver 127.0.0.1;
    
    location / {
        proxy_set_header X-Real-IP $remote_addr;
        proxy_pass rasp01.local;
    }

    location ~ /.well-known {
        allow all;
    }
}

The specified SSL options in regards to protocols and ciphers are an arbitrary choice of mine. If you have suggestions on how to improve the SSL setup, please leave a comment below.

Eventually the http2 directive might be an issue. Either check that you are using a recent version of nginx that has HTTP/2 support backed in or remove the value from the listen directive in the configuration file.

Multiple proxies

No problem with nginx. You can configure and run as many reverse proxies as would like to. Right now, I think I have three or four proxies running. Interestingly, one of them is an older set up based on Apache HTTPd which I'm going to write about in a separate article.

Do you have any interesting use cases or active configurations of nginx as reverse proxy? If yes, please use the comment section below give me and other readers more details. Thanks!

Image credit: Otto Norin