I generally write in either English, French or Mauritian Kreol.
I also use Libreoffice when I need a word processor or a spreadsheet (or, even, sometimes, a drawing software). Lately, I have discovered Flatpak (“The Future of Apps on Linux”) and Flathub (“An App Store for Linux”) and I am sold. Installing the latest version of Libreoffice from Flathub using Flatpak is a simple:
I have noticed though that this command tends to only install the English dictionaries for spellchecking. I didn’t know how to install more dictionaries to Libreoffice so I asked on the official Flathub forum. And, fortunately, someone from the community pointed me towards the solution. The idea is to get some information about the Libreoffice installation:
$ flatpak info org.libreoffice.LibreOffice

LibreOffice - The LibreOffice productivity suite

ID: org.libreoffice.LibreOffice
Ref: app/org.libreoffice.LibreOffice/x86_64/stable
Arch: x86_64
Branch: stable
Version: 6.4.3.2
License: MPL-2.0
Origin: flathub
Collection: org.flathub.Stable
Installation: system
Installed: 686.0MB
Runtime: org.freedesktop.Platform/x86_64/19.08
Sdk: org.freedesktop.Sdk/x86_64/19.08

Commit: ddcb114395acb30f633a06fd065598ace0fbe4330c49a784a50911b0222f5f95
Parent: fa891c405f685f7859e2bb623b29db5cdb3e9e1d80d8c31f30a5d21edcc9a3eb
Subject: Update to libreoffice-6.4.3.2 (5a34256e) Date: 2020-04-16 18:32:28 +0000
Notice that the runtime is org.freedesktop.Platform/x86_64/19.08 which implies that org.freedesktop.Platform.Locale/x86_64/19.08 contains all the dictionaries. But, as pointed out by stbergmann in the forum,
The *.Locale extensions are special, in that flatpak by default only downloads that part of such an extension that matches the users current system locale, while the –reinstall hack unconditionally downloads all of it. There obviously needs to be usability improvements here, as this appears to be a common issue for users.
And this is the –reinstall hack he is talking about:
In this release, among many changes brought, a notable one is that regarding how we see and think of the Linux /home directory. A new service systemd-homed.service has been added, whose role is to manage home directories.
Traditionally, user information on Linux systems have recorded in the /etc/passwd and /etc/shadow files. The former contains details about the user name, id, group id, shell, home directory, among other details, while the latter contains the user password information.
On the other hand systemd-homed.service stores user information in a ~/.identity file in JSON format. The choice of JSON was mainly due to its popularity and easiness to process with the majority of programming languages.
Thus, every directory managed by systemd-homed.service contains both the user information and the user data.
To create, remove or change home directories one would use the homectl command.
$ sudo homectl create john --real-name="John Doe" -G wheel --disk-size=500M
What if you could carry your home directory in a pendrive and work from any (Linux) machine as if you are “home” ?
$ sudo homectl create john --real-name="John Doe" --image-path=/dev/disk/by-id/usb-SanDisk_Ultra_Fit_476fff954b2b5c44-0:0 --tasks-max=500
The above command creates the user john in a pendrive and assigns a maximum of 500 concurrent task to him.
systemd-homed.service also allows you to have an encrypted home directory, but that, I will write about on another day. 😉
According to its website, “Tracker is a filesystem indexer, metadata storage system and search tool.”
“By using Tracker, you no longer have to remember where you’ve left your files. To locate a file you only need to remember something about it, such as a word in the document or the artist of the song. This is because as well as searching for files in the traditional way, by name and location, Tracker searches files’ contents and metadata.”
That’s great I guess for some people.
For me, Tracker is a massive pain as I have a lot of files, some of them huge and a lot of them being binary files (think images and photos, music files, videos, LibreOffice files, PDF documents, etc.) On my Fedora Linux installation, which is now running in a virtual machine on a brand new MacBook Pro, the Tracker extractor and indexer uses a lot of CPU resources. Too much in fact for something that I never ever use.
You see, I am an “informatician” (i.e. a computer scientist — a very bad designation — think calling a surgeon a scalpel scientist) and, as such, I make it a must to properly save all my files in folders and subfolders. I also name the files very consistently with dates, sensible use of words, etc. for proper sorting and, hence, searching.
So I don’t need Tracker as I pretty much can narrow down to the single file I need in a few seconds.
How to disable Tracker in Gnome
I found the following set of commands online which disable Tracker:
gsettings set org.freedesktop.Tracker.Miner.Files enable-monitors false
gsettings set org.freedesktop.Tracker.Miner.Files ignored-files "['*']"
gsettings set org.freedesktop.Tracker.Miner.Files crawling-interval -2
Looking at the source code of Tracker, the -2 indicates that Tracker should be disabled. The next step is to kill all current Tracker processes:
Quake was born when Christina and I were studying in France in 1996.
Like most people we knew, we fell in love with the game: the graphics were amazing (and we even bought a 3dfx Voodoo 2 to run it), the audio was great and the atmosphere phenomenal. As a matter of fact, Quake is one of the few games I completed. I ran it on Windows 95.
Fast forward 23 years
Today, my laptop runs Fedora Linux 29 and I only use its integrated Intel graphics chipset (despite the laptop having an nVidia chipset as well). This morning, I stumbled upon Quaddicted:
From there, I quickly discovered that, since Quake was released as open source software in 2012, a number of people have embarked on correcting bugs and enhancing the Quake engine. According to Quaddicted (and who am I to disagree!), the best engine for Linux is Quakespasm.
I quickly downloaded it and found an executable called quakespasm-sdl2 which I quickly ran. I got an error message telling me that a folder id1 was not found.
I remembered having zipped my Quake installation years and years ago and, because I am a very methodical guy, took only 5 seconds to find the ZIP. It had the id1 folder in it which I quickly copied to the Quakespasm folder. I got the Quake music. I ran quakespasm-sdl2 again and, lo and behold, Quake started in all its glory. I quickly selected the full screen option and opened a save game from decades ago and it worked! This is what you can see in the top screenshot.
But quake is more than quake…
While reading Quaddicted, a stumbled upon Quake Injector, a tool written in Java which allows you to easily download and run 3rd party maps in Quake. Think maps as levels, distinct from the Quake default levels, but as great and sometimes greater to play.
[Caveat: Quake Injector did not run at first as I had Java 11 on my Linux laptop. I had to switch to Java 8 (which I also had but was inactive)]
As soon as Quake Injector started, I installed the very highly rated DaMaul6 map and this is where I am now. Wish me luck as DaMaul6 is known to be very difficult.
I generally work on my laptop, an old Dell Inspiron 15 still running Fedora Linux 29 quite well. At home, I also tend to work on an Apple iMac (still) running macOS El Capitan (which I intend to upgrade to High Sierra soon — unfortunately, Apple has decided that this iMac cannot run Mojave).
Since the very beginning, I needed to have a proper file synchronisation process for these two computers and cloud solutions such as Google Drive or Dropbox were not options as I had many many Gigabytes to synchronise and this would have been very expensive to be done online.
For 1-2 years, I used Unison, a file synchronisation utility written by one of my Computer Science heroes, Benjamin Pierce, author of the quite renowned book “Types and Programming Languages” which, I have to confess, I have not yet read because, well, I never had the chance to stumble upon it. Anyway, Unison is a tool which does two-way synchronisation between computers and every time there is an inconsistency (a new file, a deleted file, a change, etc.) ask the user to manually choose on the action to make. One important of Unison is that one has to run it manually i.e. the synchronisation only happens when initiated by the user. For example, I like to run Unison every afternoon when I get back home after one day of work.
One year ago, I stopped using Unison. The reason was that I wanted to have real time synchronisation between the two computers i.e. as soon as one changes, the other one is updated (if on of course.) I settled on Syncthing. I tried two different ways of using Syncthing (with a central repository or in peer-to-peer mode) and both worked as expected. But after one year, I have to say that I have two issues with Syncthing. First of all, changes are detected through the inotify mechanism provided by Linux and the macOS kernel. As soon as a file is changed, Syncthing knows about it and can propagate the change to the other computer. All good in principle. But this also means that all errors (a file deleted by mistake, a file overwritten by mistake, etc.) are also immediately propagated. So I used different kinds of versioning techniques to make sure that backups are kept in these situations. But, nevertheless, I slowly realised that real-time propagation might not be a good idea. The second issue is that Syncthing uses a lot of CPU.
Two days ago, I stopped the Syncthing service on all my computers and revived my Unison installation. And, believe it or not, Unison works great for my use case: I can synchronise my computers when I want (after work for instance) and I have the possibility (if there are incoherences) to think deep about which version to keep. For me, and because my files are very valuable to me, this is a much better process.
[At this point, let me point out that I use Unison for synchronisation and I use regular rsync for backup on other devices. It is important to understand the difference between these two processes. Synchronisation is not always needed but backups definitely. Especially when it is compliant with the 3-2-1 strategy.]
What about you? What do you use for synchronising multiple computers when cloud synchronisation is not possible? Do you use Unison? Syncthing? Something else? Why?
The Apache HTTP Server, colloquially called Apache, is a free and open-source cross-platform web server. This article explains briefly how to set up Apache as a reverse proxy to a web site in an internal network.
To set the expectations in this article. I’m not going to explain you how to install Apache web server or how to get it operational on your system. There are thousands of tutorials including my own Accessing your web server via IPv6 on the Internet that already cover that step.
In case more information about the configuration directives used below is needed, I recommend to consult the official documentation of a particular keyword.
The scenario
I have a web site running on a system in an internal network. This could be either a full-fledged Windows/Linux server or an IoT device running on a single board computer (SBC), like i.e. a Raspberry Pi, an Arduino, ESP8266 chipset.
A reverse proxy taking requests from the Internet and forwarding them to servers in an internal network. Source: Wikipedia
Now, I want to enable access from the Internet to that internal server using Apache.
Configuring Apache as reverse proxy
In order to complete our task we need to look into the features of the mod_proxy module for Apache. Here, we get a directive called ProxyPass which does the job as expected. According to Apache’s Reverse Proxy Guide the simplest example proxies all requests ("/") to a single backend:
ProxyPass "/" "http://www.example.com/"
Additionally, to hide any reference to the system on the internal network it is required to specify the directive ProxyPassReverse to modify certain HTTP header values in the response, and use the proxy data instead.
Following is a working example of how to set up a virtual host in Apache that provides reverse proxy capabilities.
<VirtualHost *:80>
        ServerName mediacentre.kirstaetter.name

        ProxyRequests On
        ProxyPreserveHost On
        ProxyVia full

        <Proxy *>
                Order deny,allow
                Allow from all
        </Proxy>

        ProxyPass               /       http://10.0.240.4:8080/
        ProxyPassReverse        /       http://10.0.240.4:8080/
</VirtualHost>
The host system on IP address 10.0.240.4 is part of an OpenVPN infrastructure and therefore accessible from the proxy system.
Multiple proxies possible
No problem with Apache. You can configure and run as many reverse proxies as would like to. One has to pay attention to avoid overlaps either via ServerName directive or by using different port numbers to bind to. Although I have only one reverse proxy running on Apache I configured multiple scenarios using nginx. More details are described in Using nginx as reverse proxy.
Do you have any interesting use cases or active configurations of Apache as reverse proxy? If yes, please use the comment section below give me and other readers more details. Thanks!
Nginx (read: engine-x) has versatile options to set up web sites and more advanced configurations. This article explains briefly how to set up nginx as a reverse proxy to a web site in an internal network.
I have a web site running on a system in an internal network. This could be either a full-fledged Windows/Linux server or an IoT device running on a single board computer (SBC), like i.e. a Raspberry Pi, an Arduino, ESP8266 chipset.
A reverse proxy taking requests from the Internet and forwarding them to servers in an internal network. Source: Wikipedia
Now, I want to enable access from the Internet to that internal server using nginx.
Setting up nginx
In order to set up the solution you need to have a public facing web server on the Internet. Most probably it already runs nginx to serve your web site or blogging software.
I’m running a root server on Debian/GNU Linux and nginx is already installed. You can check your own system quickly like so for any running process:
$ ps fax | grep nginx
Or if you prefer a bit more details like so:
$ sudo service nginx status
● nginx.service - A high performance web server and a reverse proxy server
   Loaded: loaded (/lib/systemd/system/nginx.service; enabled)
   Active: active (running) since Do 2019-01-03 03:28:11 CET; 4 days ago
     Docs: man:nginx(8)
  Process: 29505 ExecStop=/sbin/start-stop-daemon --quiet --stop --retry QUIT/5 --pidfile /run/nginx.pid (code=exited, status=0/SUCCESS)
  Process: 29537 ExecStart=/usr/sbin/nginx -g daemon on; master_process on; (code=exited, status=0/SUCCESS)
  Process: 29535 ExecStartPre=/usr/sbin/nginx -t -q -g daemon on; master_process on; (code=exited, status=0/SUCCESS)
 Main PID: 29539 (nginx)
   CGroup: /system.slice/nginx.service
           ├─29539 nginx: master process /usr/sbin/nginx -g daemon on; master_process on;
           ├─29540 nginx: worker process
           ├─29541 nginx: worker process
           ├─29542 nginx: worker process
           └─29543 nginx: worker process
In case that nginx is not even installed on your system you could look up the package information like so:
$ apt search ^nginx
And install the web server using apt-get like so:
$ sudo apt-get install nginx-full
Which will then install nginx web/proxy server and all its dependencies on your server.
Configuring nginx as reverse proxy
Now, we have an operational installation of nginx on our Internet-facing system. We are going to create a new configuration file that defines the necessary proxy information to access our service on the internal network.
First create a new file below nginx configuration folder using your preferred text editor.
$ cd /etc/nginx/sites-available/
$ sudo nano raspberry
The file name should be relevant to either the kind of services or the system that you are going to shield using nginx as proxy.
Next, write the following server definition into your configuration file. Of course, you would adjust the server name and the IP address according to your environment:
That is the minimal configuration you would have to specify in order to run nginx as a reverse proxy to a system on your internal network. The given IP address needs to be accessible from your public web server, i.e. using a VPN infrastructure based on OpenVPN.
After saving and closing the new nginx configuration it is time to enable and check the syntax for any errors. To enable an available configuration you need to either place it or link it into the folder sites-enabled of nginx.
$ cd ../sites-enabled
$ sudo ln -s /etc/nginx/sites-available/raspberry raspberry
Now, to avoid any unexpected shutdowns or better said launching issues you should always run a configuration test before restarting the nginx service. This can be done quickly using the following command:
$ sudo service nginx configtest
[ ok ] Testing nginx configuration:.
Should your configuration file have any unknown directives and errors the output of configtest looks like this:
$ sudo service nginx configtest
[FAIL] Testing nginx configuration: failed!
You will find more details about the nature of the problem and the line number in the error log file below /var/log, i.e. here:
Only when all problems have been resolved and you have a positive response from the configtest you should restart the nginx service.
$ sudo service nginx restart
Resolve a domain name
The above described sample is very basic, and sometimes it might be necessary to avoid using an IP address for internal service. Luckily, this can configured using the resolver directive in an nginx configuration file like so:
The change in our configuration file now assumes that I have a DNS server running on the local machine which knows how to handle and resolve the specified domain name rasp01.local.
Again, this article covers the basics of reverse proxying using nginx only. There are more interesting scenario like setting your own DNS server on the internal network to provide public access to an internal resource.
Perhaps, you might want to proxy an existing service with your own custom domain, in case that the service provide does not offer this option. Using a public DNS server like Cloudflare’s 1.1.1.1, Google Public DNS (8.8.8.8), or OpenDNS as resolver should give you some ideas.
Provide secure access using SSL
Let’s take the following scenario into consideration. Your internal resource might not be configurable with an SSL certificate but you would like to enable HTTPS protocol communication from the Internet. Setting up nginx with an SSL certificate is well-documented and to combine this with the above described proxy features is a breeze to achieve.
Following you will get a more complete configuration file based on the previous example, now SSL-enabled using a Let’s Encrypt certificate.
The specified SSL options in regards to protocols and ciphers are an arbitrary choice of mine. If you have suggestions on how to improve the SSL setup, please leave a comment below.
Eventually the http2 directive might be an issue. Either check that you are using a recent version of nginx that has HTTP/2 support backed in or remove the value from the listen directive in the configuration file.
Multiple proxies
No problem with nginx. You can configure and run as many reverse proxies as would like to. Right now, I think I have three or four proxies running. Interestingly, one of them is an older set up based on Apache HTTPd which I’m going to write about in a separate article.
Do you have any interesting use cases or active configurations of nginx as reverse proxy? If yes, please use the comment section below give me and other readers more details. Thanks!
Working with several clients or partners might be an interesting challenge sometimes. While adding a new connection to an existing OpenVPN infrastructure I came across the following error message in the client log file: All TAP-Windows adapters on this system are currently in use.
Depending on how you actually installed your VPN client software you might be facing this issue while adding an additional client configuration for another connection. Especially when you are using a client software by a third-party provider, ie. WatchGuard Mobile VPN or Sophos. Perhaps you might be struggling to resolve it.
Get the TAP-Windows driver
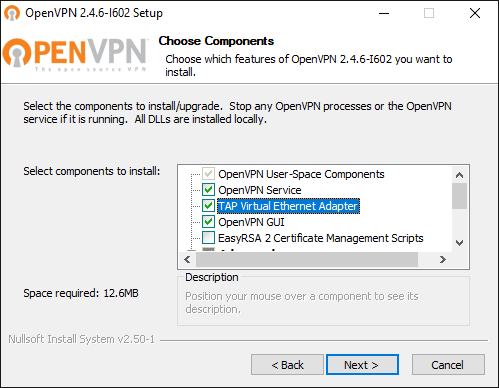
Check whether you have the full installation of OpenVPN software. If yes, you might like to skip this the following steps and directly move on to add another TAP adapter to your Windows system.
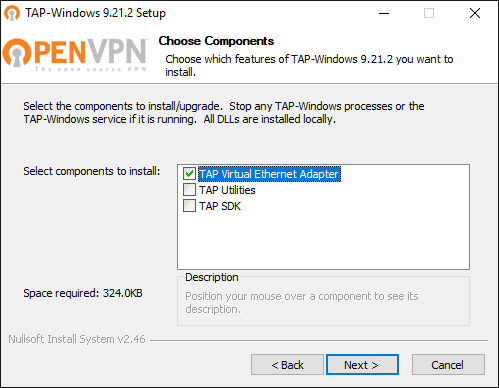
Otherwise, please navigate to the Community Downloads of OpenVPN and either get the latest OpenVPN package, or if you think that this might be an issue, scroll down a little bit on same page and get Tap-windows package for your system. After the download is complete, run the installation routine and make sure to select TAP Virtual Ethernet Adapter like so:
You might have to reboot Windows to complete the network driver installation.
Add a new TAP virtual ethernet adapter
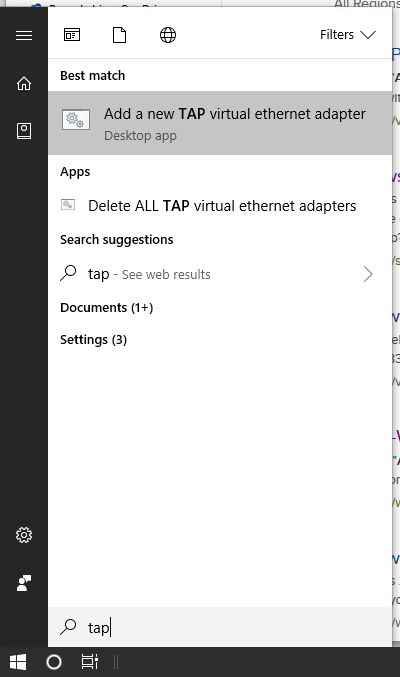
Now, you should be able to add an additional TAP interface to your system, and make it available for your new OpenVPN connection. Hit the Start button or press the Win key, then type tap and wait for Windows to give you its matches found on the system. Here is how it looks like on my Windows 10:
Click on the entry Add a new TAP virtual ethernet adapter and confirm the User Account Control (UAC) dialog with Yes. You then see an administrative command prompt that adds another network interface to your Windows.
C:\WINDOWS\system32>rem Add a new TAP virtual ethernet adapter

C:\WINDOWS\system32>"C:\Program Files\TAP-Windows\bin\tapinstall.exe" install "C:\Program Files\TAP-Windows\driver\OemVista.inf" tap0901
Device node created. Install is complete when drivers are installed...
Updating drivers for tap0901 from C:\Program Files\TAP-Windows\driver\OemVista.inf.
Drivers installed successfully.

C:\WINDOWS\system32>pause
Press any key to continue . . .
And your OpenVPN client is ready to roll.
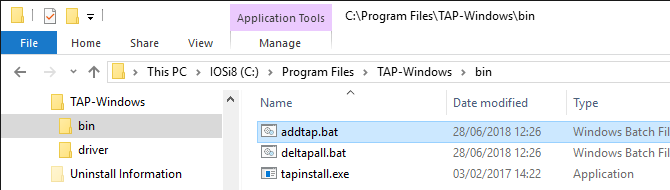
The shortcut below the Windows Start menu is linked to a batch file which you can also access and launch directly from %ProgramFiles%\TAP-Windows\bin
Note: Ensure to run the batch file with administrative permissions. Otherwise, the driver installation will fail.
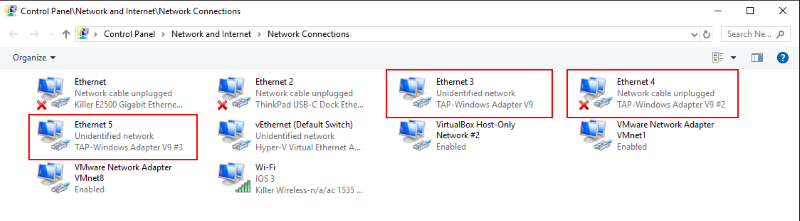
Review your existing Network Connections
Perhaps you would like to inspect the existing TAP-Windows Adapters? You find them in the Control Panel under Network Connections.
The adapters are classified as TAP-Windows Adapter V9. Here you can enable, disable or even delete an existing network interface.
Some readers might prefer interaction with a command line interface (CLI). Well, even on Windows there is nothing to worry about this. The Network Shell (Netsh) of Windows has you covered, although it is recommended to use PowerShell to manage networking technologies:
PS C:\> Get-NetAdapter

Name                      InterfaceDescription                    ifIndex Status
----                      --------------------                    ------- ------
vEthernet (Default Swi... Hyper-V Virtual Ethernet Adapter             30 Up
Wi-Fi                     Killer Wireless-n/a/ac 1535 Wireless...      28 Up
Ethernet                  Killer E2500 Gigabit Ethernet Contro...      19 Disconnected
Ethernet 4                TAP-Windows Adapter V9 #2                    15 Disconnected
VMware Network Adapte...8 VMware Virtual Ethernet Adapter for ...      14 Up
VMware Network Adapte...1 VMware Virtual Ethernet Adapter for ...      13 Up
Ethernet 2                ThinkPad USB-C Dock Ethernet                  8 Disconnected
Ethernet 5                TAP-Windows Adapter V9 #3                    52 Up
VirtualBox Host-Only ...2 VirtualBox Host-Only Ethernet Adap...#2       6 Up
Ethernet 3                TAP-Windows Adapter V9                        5 Up
The information provided is identical to the visual representation in Windows Explorer.
It’s been a very long time since I set up the VPN infrastructure at the office using OpenVPN. Today, I came across an interesting log entry that I would like to document quickly.
At the time of writing I have OpenVPN 2.4.6 running on my Windows 10 machine. The existing infrastructure though is on a different version, and this morning I observed the following entries in the log file:
Tue Aug 28 08:50:09 2018 WARNING: INSECURE cipher with block size less than 128 bit (64 bit).  This allows attacks like SWEET32.  Mitigate by using a --cipher with a larger block size (e.g. AES-256-CBC).
Tue Aug 28 08:50:09 2018 WARNING: INSECURE cipher with block size less than 128 bit (64 bit).  This allows attacks like SWEET32.  Mitigate by using a --cipher with a larger block size (e.g. AES-256-CBC).
Tue Aug 28 08:50:09 2018 WARNING: cipher with small block size in use, reducing reneg-bytes to 64MB to mitigate SWEET32 attacks.
The default encryption for the transport protocol of OpenVPN is Blowfish – a 64-bit cipher – with the CBC mode.
Meaning, the default encryption of OpenVPN prior to version 2.4 is BF-CBC which doesn’t provide enough security in recent times. Newer versions of OpenVPN though are using AES-256-CBC as default cipher.
Upgrade your cipher suite and block size
For your own sake and safety of your network(s) you should check and change your OpenVPN infrastructure right away, and if needed upgrade your defined cipher to a more secure encryption and larger block size.
OpenVPN users can change the cipher from the default Blowfish to AES
First, check which ciphers are available on your server and clients using the --show-ciphers option like so:
$ sudo openvpn --show-ciphers
The following ciphers and cipher modes are available
for use with OpenVPN.  Each cipher shown below may be
used as a parameter to the --cipher option.  The default
key size is shown as well as whether or not it can be
changed with the --keysize directive.  Using a CBC mode
is recommended.

DES-CBC 64 bit default key (fixed)
RC2-CBC 128 bit default key (variable)
DES-EDE-CBC 128 bit default key (fixed)
DES-EDE3-CBC 192 bit default key (fixed)
DESX-CBC 192 bit default key (fixed)
BF-CBC 128 bit default key (variable)
RC2-40-CBC 40 bit default key (variable)
CAST5-CBC 128 bit default key (variable)
RC2-64-CBC 64 bit default key (variable)
AES-128-CBC 128 bit default key (fixed)
AES-192-CBC 192 bit default key (fixed)
AES-256-CBC 256 bit default key (fixed)
CAMELLIA-128-CBC 128 bit default key (fixed)
CAMELLIA-192-CBC 192 bit default key (fixed)
CAMELLIA-256-CBC 256 bit default key (fixed)
SEED-CBC 128 bit default key (fixed)
Depending on your underlying Linux system the list might be more or less exhaustive. Have a look and then choose a key length of at least 128 bit.
OpenVPN currently recommends using AES-256-CBC or AES-128-CBC.
Following the article on OpenVPN and SWEET32 I chose to use AES-256-CBC cipher suite for my existing infrastructure. This seems to give me the largest compatibility between OpenVPN installations on various clients, including Raspberry Pi.
Change your OpenVPN configuration
Independent of the OpenVPN version installed, you can specify the cipher directive in your configuration files – server and client likewise. Usually that directive is either not present or commented, meaning it uses the compiled default value. Change it to your needs like so:
# Select a cryptographic cipher.
# This config item must be copied to
# the client config file as well.
;cipher BF-CBC        # Blowfish (default)
;cipher AES-128-CBC   # AES
cipher AES-256-CBC
This needs to be applied on the OpenVPN server first as well as on all OpenVPN clients. Save your configuration file and reload the new settings.
$ sudo service openvpn reload
Perhaps, you might like to publish your updated client configuration file(s) a bit earlier. With the newly set cipher any connecting client will be rejected now, if the cipher suites do not match. Monitor your syslog output on the OpenVPN server for that kind of entries:
Aug 28 07:33:26 smtp ovpn-server[18351]: 1.2.3.4:47081 WARNING: 'cipher' is used inconsistently, local='cipher AES-256-CBC', remote='cipher BF-CBC'
Aug 28 07:33:26 smtp ovpn-server[18351]: 1.2.3.4:47081 WARNING: 'keysize' is used inconsistently, local='keysize 256', remote='keysize 128'
...
Aug 28 07:34:08 smtp ovpn-server[18351]: client/1.2.3.4:47081 Authenticate/Decrypt packet error: cipher final failed
This way you are able to find out which clients are still running on the previous configuration and therefore would need a little bit of assistance.
Other hardware firewall based on OpenVPN
Thanks to some of the clients of my company IOS Indian Ocean Software Ltd. it happens that I have to connect to their networks via VPN from time to time. Given the changed cipher of my own OpenVPN infrastructure I wanted to see what others are using.
Whereas for another client who is using a firewall from Sophos the chosen cipher suite looks like this:
cipher AES-128-CBC
Well, looks like I’m in good company with my new option.
Security is a process, not a state
Again, lesson learned. Although running services on Linux is mainly about setting them up properly at the beginning, it surely doesn’t mean to forget about them in the long run. Regular reviews and audits help to mitigate newer issues and threats to your network infrastructure.
If you are an active OpenVPN user please use the comment section to share other security related configuration settings and hardening tips on OpenVPN. That would be much appreciated by myself and other readers. Thanks!
Recently I decided to coordinate my work and learning activities a little bit. Turns out that while working with .NET Core, in particular developing an API project, I do quite some coding under Linux using Visual Studio Code.
During office hours I’m fully emerged into Visual Studio 2017 running on my Windows 10 machine but often I’m reviewing and tweaking some of my code during the evening hours on my secondary Xubuntu system.
Linux and me
The story about me using Linux goes back two decades. Actually, if I remember correctly it happened some time in summer of 1996 when I officially purchased a copy of S.u.S.E. Linux 4.2. At that time I was still studying Applied Chemistry at the University of Kaiserslautern and the Unix AG on the campus offered copies of Slackware among others for free; you only had to bring the empty CDs to get the software burned on.
Note: The Unix AG was founded and still is run by a group of students and assistants in the field of computer science. And at that time there was a nice fellow named Klaus Knopper, famously known for his Linux distribution Knoppix.
Apart from attending lectures and running experiments in the chemistry laboratory I spent a good amount of time in the university’s computer labs, too. Over there you had access to graphical XTerminals running on AIX Unix compared to the regular ASCII terminals anywhere else on campus.
The two reasons I bought a copy of S.u.S.E were because I wanted to set up an internet gateway at home which I was not able to do so with Windows NT 4.0, and because the distribution was bundled with several books on installation, network configuration and Linux in general in German language. So, I started the initial installation on a Friday afternoon, worked through the whole night reading and configuring the system several times, and slept only a few hours over the whole weekend. Finally, on Monday morning after several attempts and lots of swearing/ranting over my own incapabilities I managed to run a working internet gateway. Dialup happened over ISDN on my freshly installed Linux computer while my parent’s system running Windows 95 was attached to the 10base2 thin Ethernet network.
The rest is history…
Azure is running (on) Linux
Eventually you might be aware of the situation that Microsoft is actually using Linux technology to run its cloud solution named Azure.
What better than combining two technology stacks? Although, I work on Windows systems during my day job, Linux plays a vital role. Our internet gateways are based on a designated Linux system which handles all internal traffic and provides access to the internet by providing essential services like DHCP, DNS, proxy and so forth. Services the standard router provided by a local ISP might not be capable of or with serious security concerns.
Using Azure to provision a Linux-based virtual machine takes less than 5 minutes and there are various options available.
I’m a big fan of Xubuntu but to prepare myself for MCSA: Linux on Azure I’m going to need a CentOS based system. So, instead of taking resources on my local machine using a virtualisation software like VirtualBox or VMware I’m going to entertain a Linux VM on Azure. It’s more convenient after all.
MCSA: Linux on Azure
Combining both technology stacks into one sounds almost like a dream coming true for me. Using Linux has always been a passion and fun factor for me and being able to add it more and more to my professional services brought me to the decision to look into the benefits and requirements of Microsoft’s MCSA: Linux on Azure certification.
Effectively, the exam requirements stipulate that one has to pass two independent certifications to achieve MCSA: Linux on Azure:
You might have noticed that it is not purely a Microsoft certification but integrates the work of the Linux Foundation. Interestingly Microsoft officially announced during the Connect(); 2016 that they joined the Linux Foundation as a Platinum Member. Which literally made the Linux on Azure certification possible.
Our membership to the Linux Foundation builds on our work with the foundation, including the creation of a Linux on Azure certification.
Exciting times, don’t you think?
Exam formats
Both, Microsoft and the Linux Foundation, offer details about the skill sets being measured during the exams. The Microsoft exam 70-533 is based on the usual multiple choice format. Compared to that the LFCS is performance-based.
Candidates will need to perform tasks or solve problems using the command line interface in their chosen Linux distribution.
Meaning, you connect to an actual Linux system – running either CentOS 7 or Ubuntu 16 (as of writing) – and you have to get your "hands dirty" in order to qualify.
Learning resources
Check out the section Optional training and resources on the official LFCS website. The Linux Foundation provide free material like their Certification Candidate Handbook, their Certification Preparation Guide, and their LFSx01 courses online.
In similar fashion Microsoft lists multiple resources in the Preparation options of the exam 70-533. The online training is accessible for free through the edX platform and are part of the Microsoft Professional Program in Cloud Admin, too.
Using the same preparation material gives you the ability to achieve a second accreditation. Perhaps you are interested to read more about the Cloud Administration professional program.
Having an active, annual subscription with Pluralsight I browsed through their learning paths and discovered Pluralsight Path to MSCA: Linux on Azure. It’s a combination of several courses provided by experts John Savill and Andrew Mallett.
More resources will be added regularly to my 100-days-of-exam repository on GitHub. You are hereby invited to fork it, to add more resources including other exam preparations, and to send me your pull requests (PRs).
Commitment to #100DaysOfExam
To keep myself accountable I am committed to the #100DaysOfExam challenge.
I will learn and prepare for an exam for at least an hour every day for the next 100 days.
Following the Rules section of #100DaysOfExam I will tweet about my progress using hashtag #100DaysOfExam and I will update my Log with the day’s progress and provide a link every day, too.