Using nginx as reverse proxy

Using nginx as reverse proxy

Nginx (read: engine-x) has versatile options to set up web sites and more advanced configurations. This article explains briefly how to set up nginx as a reverse proxy to a web site in an internal network.

NGINX is a free, open-source, high-performance HTTP server and reverse proxy, as well as an IMAP/POP3 proxy server. Source: https://www.nginx.com/resources/wiki/

The scenario

I have a web site running on a system in an internal network. This could be either a full-fledged Windows/Linux server or an IoT device running on a single board computer (SBC), like i.e. a Raspberry Pi, an Arduino, ESP8266 chipset.

Using nginx as reverse proxy
A reverse proxy taking requests from the Internet and forwarding them to servers in an internal network. Source: Wikipedia

Now, I want to enable access from the Internet to that internal server using nginx.

Setting up nginx

In order to set up the solution you need to have a public facing web server on the Internet. Most probably it already runs nginx to serve your web site or blogging software.

I'm running a root server on Debian/GNU Linux and nginx is already installed. You can check your own system quickly like so for any running process:

$ ps fax | grep nginx

Or if you prefer a bit more details like so:

$ sudo service nginx status
● nginx.service - A high performance web server and a reverse proxy server
   Loaded: loaded (/lib/systemd/system/nginx.service; enabled)
   Active: active (running) since Do 2019-01-03 03:28:11 CET; 4 days ago
     Docs: man:nginx(8)
  Process: 29505 ExecStop=/sbin/start-stop-daemon --quiet --stop --retry QUIT/5 --pidfile /run/nginx.pid (code=exited, status=0/SUCCESS)
  Process: 29537 ExecStart=/usr/sbin/nginx -g daemon on; master_process on; (code=exited, status=0/SUCCESS)
  Process: 29535 ExecStartPre=/usr/sbin/nginx -t -q -g daemon on; master_process on; (code=exited, status=0/SUCCESS)
 Main PID: 29539 (nginx)
   CGroup: /system.slice/nginx.service
           ├─29539 nginx: master process /usr/sbin/nginx -g daemon on; master_process on;
           ├─29540 nginx: worker process
           ├─29541 nginx: worker process
           ├─29542 nginx: worker process
           └─29543 nginx: worker process

In case that nginx is not even installed on your system you could look up the package information like so:

$ apt search ^nginx

And install the web server using apt-get like so:

$ sudo apt-get install nginx-full

Which will then install nginx web/proxy server and all its dependencies on your server.

Configuring nginx as reverse proxy

Now, we have an operational installation of nginx on our Internet-facing system. We are going to create a new configuration file that defines the necessary proxy information to access our service on the internal network.

First create a new file below nginx configuration folder using your preferred text editor.

$ cd /etc/nginx/sites-available/
$ sudo nano raspberry

The file name should be relevant to either the kind of services or the system that you are going to shield using nginx as proxy.

Next, write the following server definition into your configuration file. Of course, you would adjust the server name and the IP address according to your environment:

server {
    listen 80;
    listen [::]:80;
    
    server_name raspberry.kirstaetter.name;
    server_tokens off;

    location / {
        proxy_set_header X-Real-IP $remote_addr;
        proxy_pass 10.0.240.3;
    }
}

That is the minimal configuration you would have to specify in order to run nginx as a reverse proxy to a system on your internal network. The given IP address needs to be accessible from your public web server, i.e. using a VPN infrastructure based on OpenVPN.

After saving and closing the new nginx configuration it is time to enable and check the syntax for any errors. To enable an available configuration you need to either place it or link it into the folder sites-enabled of nginx.

$ cd ../sites-enabled
$ sudo ln -s /etc/nginx/sites-available/raspberry raspberry

Now, to avoid any unexpected shutdowns or better said launching issues you should always run a configuration test before restarting the nginx service. This can be done quickly using the following command:

$ sudo service nginx configtest
[ ok ] Testing nginx configuration:.

Should your configuration file have any unknown directives and errors the output of configtest looks like this:

$ sudo service nginx configtest
[FAIL] Testing nginx configuration: failed!

You will find more details about the nature of the problem and the line number in the error log file below /var/log, i.e. here:

$ sudo cat /var/log/nginx/error.log
2019/01/07 13:50:07 [emerg] 21662#21662: unknown directive "server_?name" in /etc/nginx/sites-enabled/raspberry:5

Only when all problems have been resolved and you have a positive response from the configtest you should restart the nginx service.

$ sudo service nginx restart

Resolve a domain name

The above described sample is very basic, and sometimes it might be necessary to avoid using an IP address for internal service. Luckily, this can configured using the resolver directive in an nginx configuration file like so:

server {
    listen 80;
    listen [::]:80;
    
    server_name raspberry.kirstaetter.name;
    server_tokens off;

    resolver 127.0.0.1;
    
    location / {
        proxy_set_header X-Real-IP $remote_addr;
        proxy_pass rasp01.local;
    }
}

The change in our configuration file now assumes that I have a DNS server running on the local machine which knows how to handle and resolve the specified domain name rasp01.local.

Again, this article covers the basics of reverse proxying using nginx only. There are more interesting scenario like setting your own DNS server on the internal network to provide public access to an internal resource.

Perhaps, you might want to proxy an existing service with your own custom domain, in case that the service provide does not offer this option. Using a public DNS server like Cloudflare's 1.1.1.1, Google Public DNS (8.8.8.8), or OpenDNS as resolver should give you some ideas.

Provide secure access using SSL

Let's take the following scenario into consideration. Your internal resource might not be configurable with an SSL certificate but you would like to enable HTTPS protocol communication from the Internet. Setting up nginx with an SSL certificate is well-documented and to combine this with the above described proxy features is a breeze to achieve.

Following you will get a more complete configuration file based on the previous example, now SSL-enabled using a Let's Encrypt certificate.

server {
    listen 80;
    listen [::]:80;
    listen 443 ssl http2;
    listen [::]:443 ssl http2;

    server_name raspberry.kirstaetter.name;
    server_tokens off;
    server_name_in_redirect off;

    client_max_body_size 50m;

    ssl on;
    ssl_certificate         /etc/letsencrypt/live/raspberry.kirstaetter.name/fullchain.pem;
    ssl_certificate_key     /etc/letsencrypt/live/raspberry.kirstaetter.name/privkey.pem;

    # modern configuration. tweak to your needs.
    ssl_protocols TLSv1 TLSv1.1 TLSv1.2;
    ssl_ciphers 'ECDHE-ECDSA-AES256-GCM-SHA384:ECDHE-RSA-AES256-GCM-SHA384:ECDHE-ECDSA-CHACHA20-POLY1305:ECDHE-RSA-CHACHA20-POLY1305:ECDHE-ECDSA-AES128-GCM-SHA256:ECDHE-RSA-AES128-GCM-SHA256:ECDHE-ECDSA-AES256-SHA384:ECDHE-RSA-AES256-SHA384:ECDHE-ECDSA-AES128-SHA256:ECDHE-RSA-AES128-SHA256';
    ssl_prefer_server_ciphers on;

    # HTTP headers
    add_header X-Content-Type-Options nosniff;
    add_header X-Frame-Options SAMEORIGIN;
    add_header X-XSS-Protection "1; mode=block";
    add_header Referrer-Policy no-referrer-when-downgrade;

    root /var/www/raspberry;
    access_log /var/log/nginx/raspberry.kirstaetter.name.access_log gzip;
    error_log /var/log/nginx/raspberry.kirstaetter.name.error_log info;

    resolver 127.0.0.1;
    
    location / {
        proxy_set_header X-Real-IP $remote_addr;
        proxy_pass rasp01.local;
    }

    location ~ /.well-known {
        allow all;
    }
}

The specified SSL options in regards to protocols and ciphers are an arbitrary choice of mine. If you have suggestions on how to improve the SSL setup, please leave a comment below.

Eventually the http2 directive might be an issue. Either check that you are using a recent version of nginx that has HTTP/2 support backed in or remove the value from the listen directive in the configuration file.

Multiple proxies

No problem with nginx. You can configure and run as many reverse proxies as would like to. Right now, I think I have three or four proxies running. Interestingly, one of them is an older set up based on Apache HTTPd which I'm going to write about in a separate article.

Do you have any interesting use cases or active configurations of nginx as reverse proxy? If yes, please use the comment section below give me and other readers more details. Thanks!

Image credit: Otto Norin

OpenVPN: All TAP-Windows adapters on this system are currently in use

OpenVPN: All TAP-Windows adapters on this system are currently in use

Working with several clients or partners might be an interesting challenge sometimes. While adding a new connection to an existing OpenVPN infrastructure I came across the following error message in the client log file: All TAP-Windows adapters on this system are currently in use.

Depending on how you actually installed your VPN client software you might be facing this issue while adding an additional client configuration for another connection. Especially when you are using a client software by a third-party provider, ie. WatchGuard Mobile VPN or Sophos. Perhaps you might be struggling to resolve it.

Get the TAP-Windows driver

Check whether you have the full installation of OpenVPN software. If yes, you might like to skip this the following steps and directly move on to add another TAP adapter to your Windows system.

Otherwise, please navigate to the Community Downloads of OpenVPN and either get the latest OpenVPN package, or if you think that this might be an issue, scroll down a little bit on same page and get Tap-windows package for your system. After the download is complete, run the installation routine and make sure to select TAP Virtual Ethernet Adapter like so:

OpenVPN: All TAP-Windows adapters on this system are currently in use

OpenVPN: All TAP-Windows adapters on this system are currently in use

You might have to reboot Windows to complete the network driver installation.

Add a new TAP virtual ethernet adapter

Now, you should be able to add an additional TAP interface to your system, and make it available for your new OpenVPN connection. Hit the Start button or press the Win key, then type tap and wait for Windows to give you its matches found on the system. Here is how it looks like on my Windows 10:

OpenVPN: All TAP-Windows adapters on this system are currently in use

Click on the entry Add a new TAP virtual ethernet adapter and confirm the User Account Control (UAC) dialog with Yes. You then see an administrative command prompt that adds another network interface to your Windows.

C:\WINDOWS\system32>rem Add a new TAP virtual ethernet adapter

C:\WINDOWS\system32>"C:\Program Files\TAP-Windows\bin\tapinstall.exe" install "C:\Program Files\TAP-Windows\driver\OemVista.inf" tap0901
Device node created. Install is complete when drivers are installed...
Updating drivers for tap0901 from C:\Program Files\TAP-Windows\driver\OemVista.inf.
Drivers installed successfully.

C:\WINDOWS\system32>pause
Press any key to continue . . .

And your OpenVPN client is ready to roll.

The shortcut below the Windows Start menu is linked to a batch file which you can also access and launch directly from %ProgramFiles%\TAP-Windows\bin

OpenVPN: All TAP-Windows adapters on this system are currently in use

Note: Ensure to run the batch file with administrative permissions. Otherwise, the driver installation will fail.

Review your existing Network Connections

Perhaps you would like to inspect the existing TAP-Windows Adapters? You find them in the Control Panel under Network Connections.

OpenVPN: All TAP-Windows adapters on this system are currently in use

The adapters are classified as TAP-Windows Adapter V9. Here you can enable, disable or even delete an existing network interface.

Some readers might prefer interaction with a command line interface (CLI). Well, even on Windows there is nothing to worry about this. The Network Shell (Netsh) of Windows has you covered, although it is recommended to use PowerShell to manage networking technologies:

PS C:\> Get-NetAdapter

Name                      InterfaceDescription                    ifIndex Status       
----                      --------------------                    ------- ------       
vEthernet (Default Swi... Hyper-V Virtual Ethernet Adapter             30 Up           
Wi-Fi                     Killer Wireless-n/a/ac 1535 Wireless...      28 Up           
Ethernet                  Killer E2500 Gigabit Ethernet Contro...      19 Disconnected 
Ethernet 4                TAP-Windows Adapter V9 #2                    15 Disconnected 
VMware Network Adapte...8 VMware Virtual Ethernet Adapter for ...      14 Up           
VMware Network Adapte...1 VMware Virtual Ethernet Adapter for ...      13 Up           
Ethernet 2                ThinkPad USB-C Dock Ethernet                  8 Disconnected 
Ethernet 5                TAP-Windows Adapter V9 #3                    52 Up           
VirtualBox Host-Only ...2 VirtualBox Host-Only Ethernet Adap...#2       6 Up           
Ethernet 3                TAP-Windows Adapter V9                        5 Up           

The information provided is identical to the visual representation in Windows Explorer.

OpenVPN re-visited

OpenVPN re-visited

It's been a very long time since I set up the VPN infrastructure at the office using OpenVPN. Today, I came across an interesting log entry that I would like to document quickly.

OpenVPN re-visited

At the time of writing I have OpenVPN 2.4.6 running on my Windows 10 machine. The existing infrastructure though is on a different version, and this morning I observed the following entries in the log file:

Tue Aug 28 08:50:09 2018 WARNING: INSECURE cipher with block size less than 128 bit (64 bit).  This allows attacks like SWEET32.  Mitigate by using a --cipher with a larger block size (e.g. AES-256-CBC).
Tue Aug 28 08:50:09 2018 WARNING: cipher with small block size in use, reducing reneg-bytes to 64MB to mitigate SWEET32 attacks.

Curious about those entries I found Sweet32: Birthday attacks on 64-bit block ciphers in TLS and OpenVPN as an informative reference on the documented vulnerabilities CVE-2016-2183 and CVE-2016-6329. There I found the connection back to OpenVPN. Which is also described on the official wiki: OpenVPN and SWEET32

The default encryption for the transport protocol of OpenVPN is Blowfish – a 64-bit cipher – with the CBC mode.

Meaning, the default encryption of OpenVPN prior to version 2.4 is BF-CBC which doesn't provide enough security in recent times. Newer versions of OpenVPN though are using AES-256-CBC as default cipher.

Upgrade your cipher suite and block size

For your own sake and safety of your network(s) you should check and change your OpenVPN infrastructure right away, and if needed upgrade your defined cipher to a more secure encryption and larger block size.

OpenVPN users can change the cipher from the default Blowfish to AES

First, check which ciphers are available on your server and clients using the --show-ciphers option like so:

$ sudo openvpn --show-ciphers
The following ciphers and cipher modes are available
for use with OpenVPN.  Each cipher shown below may be
used as a parameter to the --cipher option.  The default
key size is shown as well as whether or not it can be
changed with the --keysize directive.  Using a CBC mode
is recommended.

DES-CBC 64 bit default key (fixed)
RC2-CBC 128 bit default key (variable)
DES-EDE-CBC 128 bit default key (fixed)
DES-EDE3-CBC 192 bit default key (fixed)
DESX-CBC 192 bit default key (fixed)
BF-CBC 128 bit default key (variable)
RC2-40-CBC 40 bit default key (variable)
CAST5-CBC 128 bit default key (variable)
RC2-64-CBC 64 bit default key (variable)
AES-128-CBC 128 bit default key (fixed)
AES-192-CBC 192 bit default key (fixed)
AES-256-CBC 256 bit default key (fixed)
CAMELLIA-128-CBC 128 bit default key (fixed)
CAMELLIA-192-CBC 192 bit default key (fixed)
CAMELLIA-256-CBC 256 bit default key (fixed)
SEED-CBC 128 bit default key (fixed)

Depending on your underlying Linux system the list might be more or less exhaustive. Have a look and then choose a key length of at least 128 bit.

OpenVPN currently recommends using AES-256-CBC or AES-128-CBC.

Following the article on OpenVPN and SWEET32 I chose to use AES-256-CBC cipher suite for my existing infrastructure. This seems to give me the largest compatibility between OpenVPN installations on various clients, including Raspberry Pi.

Change your OpenVPN configuration

Independent of the OpenVPN version installed, you can specify the cipher directive in your configuration files - server and client likewise. Usually that directive is either not present or commented, meaning it uses the compiled default value. Change it to your needs like so:

# Select a cryptographic cipher.
# This config item must be copied to
# the client config file as well.
;cipher BF-CBC        # Blowfish (default)
;cipher AES-128-CBC   # AES
cipher AES-256-CBC

This needs to be applied on the OpenVPN server first as well as on all OpenVPN clients. Save your configuration file and reload the new settings.

$ sudo service openvpn reload

Perhaps, you might like to publish your updated client configuration file(s) a bit earlier. With the newly set cipher any connecting client will be rejected now, if the cipher suites do not match. Monitor your syslog output on the OpenVPN server for that kind of entries:

Aug 28 07:33:26 smtp ovpn-server[18351]: 1.2.3.4:47081 WARNING: 'cipher' is used inconsistently, local='cipher AES-256-CBC', remote='cipher BF-CBC'
Aug 28 07:33:26 smtp ovpn-server[18351]: 1.2.3.4:47081 WARNING: 'keysize' is used inconsistently, local='keysize 256', remote='keysize 128'
...
Aug 28 07:34:08 smtp ovpn-server[18351]: client/1.2.3.4:47081 Authenticate/Decrypt packet error: cipher final failed

This way you are able to find out which clients are still running on the previous configuration and therefore would need a little bit of assistance.

Other hardware firewall based on OpenVPN

Thanks to some of the clients of my company IOS Indian Ocean Software Ltd. it happens that I have to connect to their networks via VPN from time to time. Given the changed cipher of my own OpenVPN infrastructure I wanted to see what others are using.

According to my own article Connecting Linux to WatchGuard Firebox SSL (OpenVPN client) one of the client configuration reads like this:

cipher AES-256-CBC

Whereas for another client who is using a firewall from Sophos the chosen cipher suite looks like this:

cipher AES-128-CBC

Well, looks like I'm in good company with my new option.

Security is a process, not a state

Again, lesson learned. Although running services on Linux is mainly about setting them up properly at the beginning, it surely doesn't mean to forget about them in the long run. Regular reviews and audits help to mitigate newer issues and threats to your network infrastructure.

If you are an active OpenVPN user please use the comment section to share other security related configuration settings and hardening tips on OpenVPN. That would be much appreciated by myself and other readers. Thanks!

Next stop: MCSA: Linux on Azure

Next stop: MCSA: Linux on Azure

Recently I decided to coordinate my work and learning activities a little bit. Turns out that while working with .NET Core, in particular developing an API project, I do quite some coding under Linux using Visual Studio Code.

During office hours I'm fully emerged into Visual Studio 2017 running on my Windows 10 machine but often I'm reviewing and tweaking some of my code during the evening hours on my secondary Xubuntu system.

Linux and me

The story about me using Linux goes back two decades. Actually, if I remember correctly it happened some time in summer of 1996 when I officially purchased a copy of S.u.S.E. Linux 4.2. At that time I was still studying Applied Chemistry at the University of Kaiserslautern and the Unix AG on the campus offered copies of Slackware among others for free; you only had to bring the empty CDs to get the software burned on.

Note: The Unix AG was founded and still is run by a group of students and assistants in the field of computer science. And at that time there was a nice fellow named Klaus Knopper, famously known for his Linux distribution Knoppix.

Apart from attending lectures and running experiments in the chemistry laboratory I spent a good amount of time in the university's computer labs, too. Over there you had access to graphical XTerminals running on AIX Unix compared to the regular ASCII terminals anywhere else on campus.

The two reasons I bought a copy of S.u.S.E were because I wanted to set up an internet gateway at home which I was not able to do so with Windows NT 4.0, and because the distribution was bundled with several books on installation, network configuration and Linux in general in German language. So, I started the initial installation on a Friday afternoon, worked through the whole night reading and configuring the system several times, and slept only a few hours over the whole weekend. Finally, on Monday morning after several attempts and lots of swearing/ranting over my own incapabilities I managed to run a working internet gateway. Dialup happened over ISDN on my freshly installed Linux computer while my parent's system running Windows 95 was attached to the 10base2 thin Ethernet network.

The rest is history...

Azure is running (on) Linux

Eventually you might be aware of the situation that Microsoft is actually using Linux technology to run its cloud solution named Azure.

Yes, they do... According to an article Whoa. Microsoft is using Linux to run its cloud published on Wired back in September 2015 it is referring to an official blog article by Microsoft. Get more details about the Azure Cloud Switch in Microsoft showcases the Azure Cloud Switch (ACS) by Kamala Subramaniam Principal Architect, Azure Networking.

It [note: The Azure Cloud Switch (ACS)] is a cross-platform modular operating system for data center networking built on Linux.

Nonetheless, I would assume that the main interest would be to run and operate Linux machines in Azure. According to Microsoft says 40 percent of all VMs in Azure now are running Linux we are in good company with like-minded system operators.

What better than combining two technology stacks? Although, I work on Windows systems during my day job, Linux plays a vital role. Our internet gateways are based on a designated Linux system which handles all internal traffic and provides access to the internet by providing essential services like DHCP, DNS, proxy and so forth. Services the standard router provided by a local ISP might not be capable of or with serious security concerns.

Using Azure to provision a Linux-based virtual machine takes less than 5 minutes and there are various options available.

Next stop: MCSA: Linux on Azure

I'm a big fan of Xubuntu but to prepare myself for MCSA: Linux on Azure I'm going to need a CentOS based system. So, instead of taking resources on my local machine using a virtualisation software like VirtualBox or VMware I'm going to entertain a Linux VM on Azure. It's more convenient after all.

MCSA: Linux on Azure

Combining both technology stacks into one sounds almost like a dream coming true for me. Using Linux has always been a passion and fun factor for me and being able to add it more and more to my professional services brought me to the decision to look into the benefits and requirements of Microsoft's MCSA: Linux on Azure certification.

Effectively, the exam requirements stipulate that one has to pass two independent certifications to achieve MCSA: Linux on Azure:

You might have noticed that it is not purely a Microsoft certification but integrates the work of the Linux Foundation. Interestingly Microsoft officially announced during the Connect(); 2016 that they joined the Linux Foundation as a Platinum Member. Which literally made the Linux on Azure certification possible.

Our membership to the Linux Foundation builds on our work with the foundation, including the creation of a Linux on Azure certification.

Exciting times, don't you think?

Exam formats

Both, Microsoft and the Linux Foundation, offer details about the skill sets being measured during the exams. The Microsoft exam 70-533 is based on the usual multiple choice format. Compared to that the LFCS is performance-based.

Candidates will need to perform tasks or solve problems using the command line interface in their chosen Linux distribution.

Meaning, you connect to an actual Linux system - running either CentOS 7 or Ubuntu 16 (as of writing) - and you have to get your "hands dirty" in order to qualify.

Learning resources

Check out the section Optional training and resources on the official LFCS website. The Linux Foundation provide free material like their Certification Candidate Handbook, their Certification Preparation Guide, and their LFSx01 courses online.

In similar fashion Microsoft lists multiple resources in the Preparation options of the exam 70-533. The online training is accessible for free through the edX platform and are part of the Microsoft Professional Program in Cloud Admin, too.
Using the same preparation material gives you the ability to achieve a second accreditation. Perhaps you are interested to read more about the Cloud Administration professional program.

Having an active, annual subscription with Pluralsight I browsed through their learning paths and discovered Pluralsight Path to MSCA: Linux on Azure. It's a combination of several courses provided by experts John Savill and Andrew Mallett.

More resources will be added regularly to my 100-days-of-exam repository on GitHub. You are hereby invited to fork it, to add more resources including other exam preparations, and to send me your pull requests (PRs).

Commitment to #100DaysOfExam

To keep myself accountable I am committed to the #100DaysOfExam challenge.

I will learn and prepare for an exam for at least an hour every day for the next 100 days.

Following the Rules section of #100DaysOfExam I will tweet about my progress using hashtag #100DaysOfExam and I will update my Log with the day's progress and provide a link every day, too.

Let's do it!

ICT skills at primary school

ICT skills at primary school

Our children have computer lectures at their primary school since this year. In general, it's a great idea that students are exposed to computer literacy at an early stage. But sometimes it comes with small hiccups. Like in our case...

Curriculum, literature and exercise book

Although our children have access to computers at home since a while already it is the curriculum of their primary school in regards to IT literacy that lead to this blog article.

The title "Let's Learn ICT Skills" by the Mauritius Institute of Education (MIE) introduces Computer Fundamentals and Operations to young learners at primary school level. The textbook is divided into six units and covers first steps into the world of ICT.

Starting with an orientation in Windows the title discusses the essential use of typical desktop applications to handle word processing, to introduce simple graphics and presentation skills, to cover basic functionality in spreadsheets and to venture into the unknown areas of the interweb.

Each chapter has different learning objectives and introduces elementary skills in various applications. To keep matters easy the textbook is focused on Windows operating system and the Microsoft Office suite. Which in general and most commonly okay for the majority of primary school students.
Not sure whether it classifies as a tutorial. You are most welcome to comment and assist. #BlogMore about modern parenting obstacles...

https://jochen.kirstaetter.name/azure-for-school/
Well, most students... ;-)

Our start situation - Linux

As a parent it is not easy to trust a full-fledged computer into the hands of your youngster(s) without fearing the whole system might be infested by viruses, malware and ransomware in shortest time. Especially given recent reports on various problems.

Following my decision to provide our kids with family-friendly and security-enhanced tablets running on Amazon's Fire OS compared to regular Android, it was only right to provide them a similar experience on the desktop. At least in my point of view.

Personally, it was important for me to have peace of mind knowing our children are using Linux based system. Don't get me wrong Microsoft has done a tremendous job to improve security over the last decade. It's just that I didn't want to purchase a new laptop for them and Linux runs just fine on older hardware.

Instead of upgrading the available HP laptop from Windows Vista Business to latest Windows 10 I decided to install Xubuntu 17.04 originally. Some weeks back, I then upgraded their machine to Bionic Beaver (version 18.04) already, and they can "beta-test" the upcoming Ubuntu LTS version.

After all, as more and more software is moved towards web applications it really doesn't matter anymore whether Firefox is run under Windows or Linux, does it? Additionally, they have access to LibreOffice, GIMP and other educational software packages like GCompris, and so forth.

Well, the children's exercise book is explicitly covering Windows, some applications of the Microsoft Office suite as well as Paint.net - software that isn't available on Linux out of the box.

Various approaches possible

Of course, there is no golden solution to this situation and multiple possibilities are given. All depending on circumstances, personal taste and eventual hardware constraints. Following, I would like to give you an overview of options - all of which I already used successfully in the past.

Virtualisation

This might come first in someone's mind and I have to agree with that. Installing a virtualisation software like Oracle VirtualBox, VMware Workstation or even qemu can be done easily and the the actual experience can be seamless. In our situation though is the existing hardware with a previous generation CPU and 2 GB RAM only the limiting factor to this approach.

Using wine or CodeWeavers CrossOver

Emulation software like wine or CodeWeavers CrossOver eliminate the necessity to install and run a complete virtualisation solution. The software provides an abstraction layer of native Windows API functionality and allows to install and run Windows software like the Microsoft Office suite among others directly on a Linux machine. Luckily, the hardware wouldn't be the limiting factor but I have to confess that it is my laziness to opt-in for this viable approach. Also, the first chapter in the kids' literature - Getting familiar with Windows - wouldn't be possible for them using this approach.

Remote access

Last but not least, providing remote access to an existing instance of a Windows system seems to be one of the easiest options. Here, the kids get to experience Windows directly and it doesn't need any resources on their Linux system. Using a software package like rdesktop or remmina enables a Linux user to connect to a Windows system via Remote Desktop Protocol (RDP). So far so good, but I'm not interested to provision a dedicated machine for this purpose at home. The system would be idle most of the time and consume a good chunk of electricity instead.

As mentioned earlier I have used all those approaches successfully, and it is good fun to tinker around with them. But those are most likely options for an adult and not really suitable for a child attending primary school.

A solution - Cloud-based virtual machine

Taking the pro aspects of each of the approaches earlier I decided to provision a virtual machine running Windows 10 Professional in the cloud. Access to that machine is available using RDP and in regards to hardware constraints it requires an internet connection only.

Actually, this suits me very well as it gives me control on various levels:

  • Local network: I can control at any time whether the kids' laptop gets access to our WiFi network or the internet based on simple authentication and routing configuration.
  • Operating times: A virtual machine in Azure is fully controlled through the Azure portal. I can decide when the VM is running and when not.
  • Hardware on demand: Provisioning hardware to the VM on Azure is just a few clicks and a reboot away.
  • Data exchange: Synchronisation of files between the local Linux laptop and the Windows machine in Azure is based on cloud storage providers like OneDrive, Google Drive, Dropbox, etc. Meaning backup of files is integrated and additional devices like their tablets can be added easily.

Later on, if the VM isn't needed anymore or in case the children totally messed it up I don't have to worry about anything. The VM gets decommissioned and can be provisioned again within minutes if needed.

Azure configuration and fine-tuning

To start with this educational system for my children I went into the Azure Portal and created a new virtual machine using the Windows 10 Pro image. To keep nice and smooth I also created a new resource group to isolate it from other business-related activities.Given

Size of the VM

ICT skills at primary school
I chose a (hopefully) decent hardware setup running the virtual machine on a Standard B4MS (4 cores with 16 GB RAM) tier. This should be sufficient enough for Microsoft Office, Paint.net and Firefox.

Auto-shutdown

Also, I activated the Auto-shutdown feature which restricts the use of the system until a specified time, and helps me to save a heap of money, too.
ICT skills at primary school
The main purpose of that VM is to allow the children to follow the exercises and steps in their school book. At the given time the system simply shuts down, and it's dinner time in the off-line world.

Starting the VM

Now that we know how to stop the VM we should have a look about how to start it. There are multiple choices available. Most obvious you can launch the virtual machine via the Azure Portal itself. Nothing surprising here.

Next, Microsoft offers the free Azure mobile app for Android and iOS to stay connected to your Azure resources. This is quite neat to manage, monitor and operate Azure on the go.

And then there is azure-cli - the Command-line tools for Azure - which gives you the next generation multi-platform command line experience for Azure.

$ az 

     /\
    /  \    _____   _ _  ___ _
   / /\ \  |_  / | | | \'__/ _\
  / ____ \  / /| |_| | | |  __/
 /_/    \_\/___|\__,_|_|  \___|


Welcome to the cool new Azure CLI!

Usually, I have Visual Studio Code open almost the whole day and starting the kids' virtual machine is done using the Azure CLI Tools extension.
ICT skills at primary school

I'm currently using the following .azcli file to manage that VM:

# Logging into Azure
az login

# Starting kids' VM on Azure
az vm start -g Personal -n windows4kids

# Stopping kids' VM
az vm stop -g Personal -n windows4kids --no-wait

The az login triggers the device login on Azure and after entering a generated code to authenticate your machine you get access to your resources on Azure, like this:
ICT skills at primary school

Accessing the VM

Windows machines on Azure are accessed via RDP and Linux has a variety of client applications for that protocol. In the portal you should assign a static domain name to your VM as the public IP address is most likely to change between daily uses. The portal allows you to download the Connect parameters as a .rdp file that you can open in any text editor on Linux.

ICT skills at primary school
Using the details from the .rdp it is possible to set up a new connection in remmina for future use. I'm storing the password to keep it simple for the children to access their new Windows machine.

Now, remmina is configured to start automatically after they logged into their account and the Windows VM on Azure is easy accessible via shortcut from the system tray area.

Give it a try - Azure free credit

Microsoft gives new sign-ups on Azure an initial credit that allows you to explore the various options and get yourself familiar with the available resources. Why don't you give it a try?

Informative and Restrained as opposed to Superficial and Flashy

Infotech 2017 has started.

And I am happy to notice that, except for one or two stands, things are much more “Informative and Restrained” compared to previous editions where things tended to be “Superficial and Flashy”.

Allow me to explain.

In Mauritius, for the past few years, we have become a nation of seminars, workshops, conferences and exhibitions and, unfortunately, many of them are quite superficial and very very flashy indeed. For the past six months, I have been to many such events where the venue was beautiful (a nice hotel with a beautiful view of the lagoon), the food was excellent, the hostesses out of this world but where, personally, I felt that there was not much to listen to and learn from, except from a minority of the speakers. This is what I call “Superficial and Flashy”.

What I would prefer to have, from a personal point of view, is the kind of chaotic geekish meetup as pictured above. An event where intelligent people of all horizons can meet, exchange views, share ideas and move forward together. Of course, there is a need for a venue and some food but nothing ostentatious. This is what I call “Informative and Restrained”.

The thing is that it is easier to do “Superficial and Flashy” than “Informative and Restrained”. The reason for that is that to be informative, the speakers need to be of high-caliber and need to be properly prepared.

This is your typical Googler. Similar people are changing our worlds everyday at Google, Facebook, Amazon, Apple, etc. but also in the IT division of most of the companies in the world. And, before you laugh, let me remind you that they run the world.

Pictured above are some of the people who have basically built the world as it is known today. Without them, we would still be waiting for The A-Team to be shown on TV on Saturday night. They are Steve Jobs (Apple), Sergey Brin (Google), Bill Gates (Microsoft), Larry Page (Google), Mark Zuckerberg (Facebook) and Jeff Bezos (Amazon). The missing ones being Linus Torvalds (Linux) and Richard Stallman (Free Software Foundation).

Of course, we won’t have Steve (RIP), Sergey, Bill, Larry, Mark, Jeff, Linus or Richard at Infotech. Maybe next year…

But we’ll have the 2nd best thing: the (real) innovators of Mauritius, each on his/her respective “Informative and Restrained” stand and willing to share his/her passion with you.

You just have to put aside your tendency to value the “Superficial and Flashy”, walk toward them and talk to them.

Enjoy 🙂

(First photo, courtesy of Le Méridien. Second photo, courtesy of Concept7. Third photo, courtesy of Business Insider. Fourth photo, courtesy of Youth Connect. Fifth photo, courtesy of PC Risk).

How to reduce the amount of disk space used by the systemd journal

We, Linux people, generally use systemd now and one of its components is the journal controlled by the journalctl command line tool.

As explained on the Arch wiki,

systemd has its own logging system called the journal. The /var/log/journal/directory is a part of the systemd package and the journal will write to /var/log/journal/

The journal is always appended and therefore grows in size. On my laptop, the journal was taking 1.8Gb of space and was full of details which, I believe, I’ll never need. So I decided to clear all old contents (which the systemd people call a vacuum). I issued:

journalctl --disk-usage
journalctl --vacuum-size=64M
journalctl --disk-usage

And the journal immediately became smaller. I then issued a

journalctl --verify

which made me realise that some of the remaining journal files were corrupted (for some reason). There is no journal repair tool in systemd so I simply removed the offending files (with rm).

Now, I can easily check my journal entries for today and I know everything will be all fine:

journalctl --since today

Ghost Desktop on Xubuntu 17.04 won’t start

Ghost Desktop on Xubuntu 17.04 won't start

Already before the migration from Joomla to Ghost last weekend I run the Ghost Desktop application on Windows. Now, after the successful completion it was about time to get going on my other machines. You know, the ones away from the main rig... Usually used during the evening hours, just for fun, or experimenting.

Tonight, I decided to give one of my Linux systems some attention, started to upgrade some packages, and installed new software. Among those also Ghost Desktop App for Linux. On the Ghost website you get version 1.3.0 (as of writing), and it's a Debian package.

Knowing that the desktop app is an Electron-based application, and I already packaged a few Electron apps myself, it would run on any Ubuntu-based system, too.
Note: This post was written in Ghost Desktop running on Xubuntu 17.04 64bit

Installation of Ghost Desktop

Either you double-click on the downloaded .deb package and your system will prompt you to open/install the application in Software, or you can run the following command in the Terminal:

$ sudo dpkg -i ~/Downloads/ghost-desktop-1.3.0-debian.deb 

Ghost Desktop can then be launched via the Application Menu/Launcher under ghost-desktop or if you prefer the terminal:

$ Ghost

The problem: Ghost Desktop won't start

If you try to launch the application via the menu or any other GUI launcher you won't get any response at all. The software just isn't executed, it seems.

Compared to running it in the Terminal. This might produce the following output:

$ Ghost
A JavaScript error occurred in the main process
Uncaught Exception:
Error: Unable to find a valid app
    at Object.<anonymous> (/usr/lib/Ghost/resources/electron.asar/browser/init.js:121:9)
    at Object.<anonymous> (/usr/lib/Ghost/resources/electron.asar/browser/init.js:173:3)
    at Module._compile (module.js:571:32)
    at Object.Module._extensions..js (module.js:580:10)
    at Module.load (module.js:488:32)
    at tryModuleLoad (module.js:447:12)
    at Function.Module._load (module.js:439:3)
    at Module.runMain (module.js:605:10)
    at run (bootstrap_node.js:424:7)
    at startup (bootstrap_node.js:147:9)

The solution: Set permissions

Fortunately, this has been reported already on GitHub by user letsjustfixit. The issue is caused by a missing permission bit on the Electron app. A temporary workaround has been documented until the package is going to be fixed.

Run the following chmod to set read and execute bits on the Electron app and dependent components. Then launch Ghost Desktop again.

$ sudo chmod -R +rx /usr/lib/Ghost/resources/app
$ Ghost 

 ⚡️  Welcome to Ghost  👻

Happy blogging!

It's great to see that such issues are handled on GitHub, and the "fix" is easily done.

As maintainer of own Electron-based applications I'm interested in the root cause. So far, I didn't come across a similar problem (touching wood!). Thankfully, I'm going to add this to my notes on Electron.

If you're familiar with this kind of problem regarding Electron packaging on Linux, give it try to fix it. On my side, I already cloned the Ghost-Desktop repository. Let's see whether I'm able to create a pull request for the Ghost community.

Open and not extract .docx, .xlsx and .pptx files in the latest Gnome 3

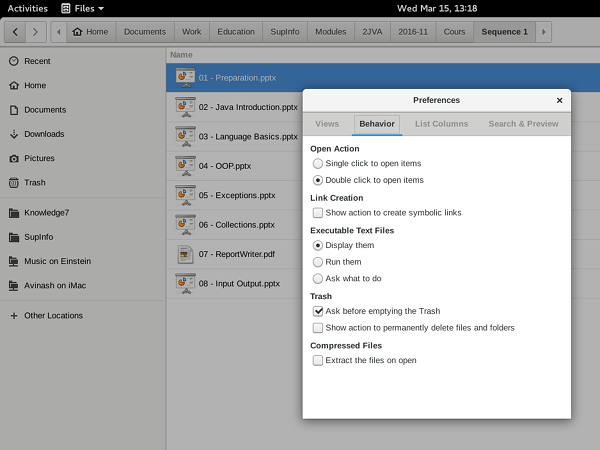
In the latest version of Gnome 3, a subtle change was brought to Nautilus, the file manager, to automatically extract the content of a ZIP file in a new folder when it is double-clicked on instead of open an application to do so. The problem is that Microsoft Office files (.docx, .xlsx, .pptx, etc.) are ZIP files. This means that double-clicking on a .pptx file extracts its content instead of opening the file in, say, LibreOffice Impress!

This makes life miserable for all those who need to open Microsoft Office files on a regular basis and, of course, this is a bug (as acknowledged by the Gnome people  and the Red Hat / Fedora people).

Fortunately, it is quite easy to make Nautilus become sane again. Open Preferences and in the Behavior tab, unselect “Extract the files on open” in the Compressed Files section.

Phew!

World Creativity and Innovation Day

20160421-panelists

Every 21 April, we celebrate the World Creativity and Innovation Day in Mauritius.

This year, the Mauritius Research Council organised a workshop on Creativity and Innovation and the the ICT Advisory Council, which I preside, was given a slot of 30 minutes. I quickly prepared a few slides like I like them to be (beautiful, memorable and witty) and I asked Logan Velvindron and Ish Sookun, both members of the ICT Advisory Council, to join me in a panel on Creativity and Innovation among Youth.

20160421-albert-einstein

The first topic was about having fun when learning and creating. I mentioned that school and teachers can be boring, especially in our age of having Wikipedia and YouTube in our pockets. I said that it was time for our education system to become fun again, where young people can enjoy creating and learning a lot of new things in the process. Both Ish and Logan explained how fun they have everyday at work and how important this is for them.

20160421-steve-jobs

The second topic was about not to be afraid to be different. In Mauritius, we have a culture of conformism. Women have specific roles to play. Kids also. And, of course, everyone should remain at his place. This is bullshit! Our world is created by people who think differently and who are not afraid to take risks and disrupt existing establishments… Logan and Ish told the audience how they discovered computers, decided to become geeks and do things differently from others. They were very thankful to have supportive parents who didn’t try to impose anything on them.

20160421-linus-torvalds

The third topic was about being a geek and the value of open source software for a country like Mauritius. I explained that open source software is free and this is very important for Mauritius which is not a very rich country. But I also explained how having access to the source code of software is essential for Computer Science teachers like me to create the new generation of top programmers which Mauritius will need in the future. Young people cannot learn complex programming just by reading a book or listening to a teacher: they need to see real source code of real complex software. Logan and Ish explained how they got involved in open source software and how we all now form part of organisations such the Linux User Group of Mauritius and Hackers.mu and the value those organisations have.

20160421-sheryl-sandberg

The last topic was about being a doer rather than a talker and that aiming for perfection, while sometimes a good thing, can sometimes prevent us from achieving. This is something I have noticed over the years in Mauritius: we love our committees. Doers are not revered though. This mentality has to change. I told the audience that we are as good as anyone from anywhere, whether it is the USA or France or India. But we should stop focusing on doing speeches. We should identify small but important problems and find feasible solutions for them.

After the panel, I got a question from Anibal Martinez who is collaborating with the Government to set up an incubator. He asked me how we can solve the Computer Science education issue in Mauritius.

I told him that in the short term, a lot can be done with ad-hoc training courses, such as the ones that I provide at Knowledge Seven. But this is not a viable model for the country. In the medium to long term, state-funded universities should find a way to revamp their Computer Science departments, which are absolutely substandard at this moment, to produce an adequate number of very competent computer scientists every year. The industry is ready to move up a level but there are not enough competencies.

Thanks to Ish and Logan for participating in the panel.